


This post may contain affiliate links. Please read our disclosure policy.
I don’t know about your family, but at any party or holiday meal, these Southern Deviled Eggs are always the first to disappear. Doesn’t matter if I make a dozen or two; they vanish before I’ve even set the platter down. There’s just something about that creamy, tangy filling tucked into a tender egg white that keeps folks coming back for “just one more.”
For me, deviled eggs aren’t just a recipe – they’re a tradition. An appetizer that’s been passed down through my family for years and years. They remind me of holiday dinners at Mom’s house, Sunday suppers after church, and potlucks where everyone brought their best. It’s the kind of food that feels like home, and I love passing that feeling on every time I make them.
With just 7 simple ingredients, it’s no wonder they are so popular and easy to make. Plus it’s fun to experiment with different flavors of the filling too! If you love an easy appetizer, my Loaded Tater Tot Cups and Boiled Peanuts are two other favorites.
why you’ll love this Recipe

These deviled eggs are the perfect entertaining recipe for beginner cooks, kids, and friends to all help out with. It’s fun to peel and fill the eggs, and they’re also easy to make in advance.
❥ Flawless Peeling Technique: We don’t just boil eggs—we steam them. If you’ve never tried this method before, it’s pure magic. Steaming followed by an ice bath, creates the perfect thermal shock to help the shell slip right off. No more craters or torn whites—just smooth, pretty egg halves, ready to fill.
❥ That Classic Southern Flavors: This is all about the balance of the egg yolk filling. Creamy mayo, a touch of yellow mustard, and just enough dill relish (or sweet, if that’s your thing) to give it that signature tang. It’s the flavor profile that makes this recipe feel like it’s been passed down for generations—because it has.
❥ Velvety Smooth Filling: No dry or lumpy filling here. I mash the yolks thoroughly (a sieve or small blender works wonders, too) so the texture is smooth and light, easy to spoon—or pipe—right into the whites. It’s creamy, airy, and melts in your mouth
NikkiIngredients
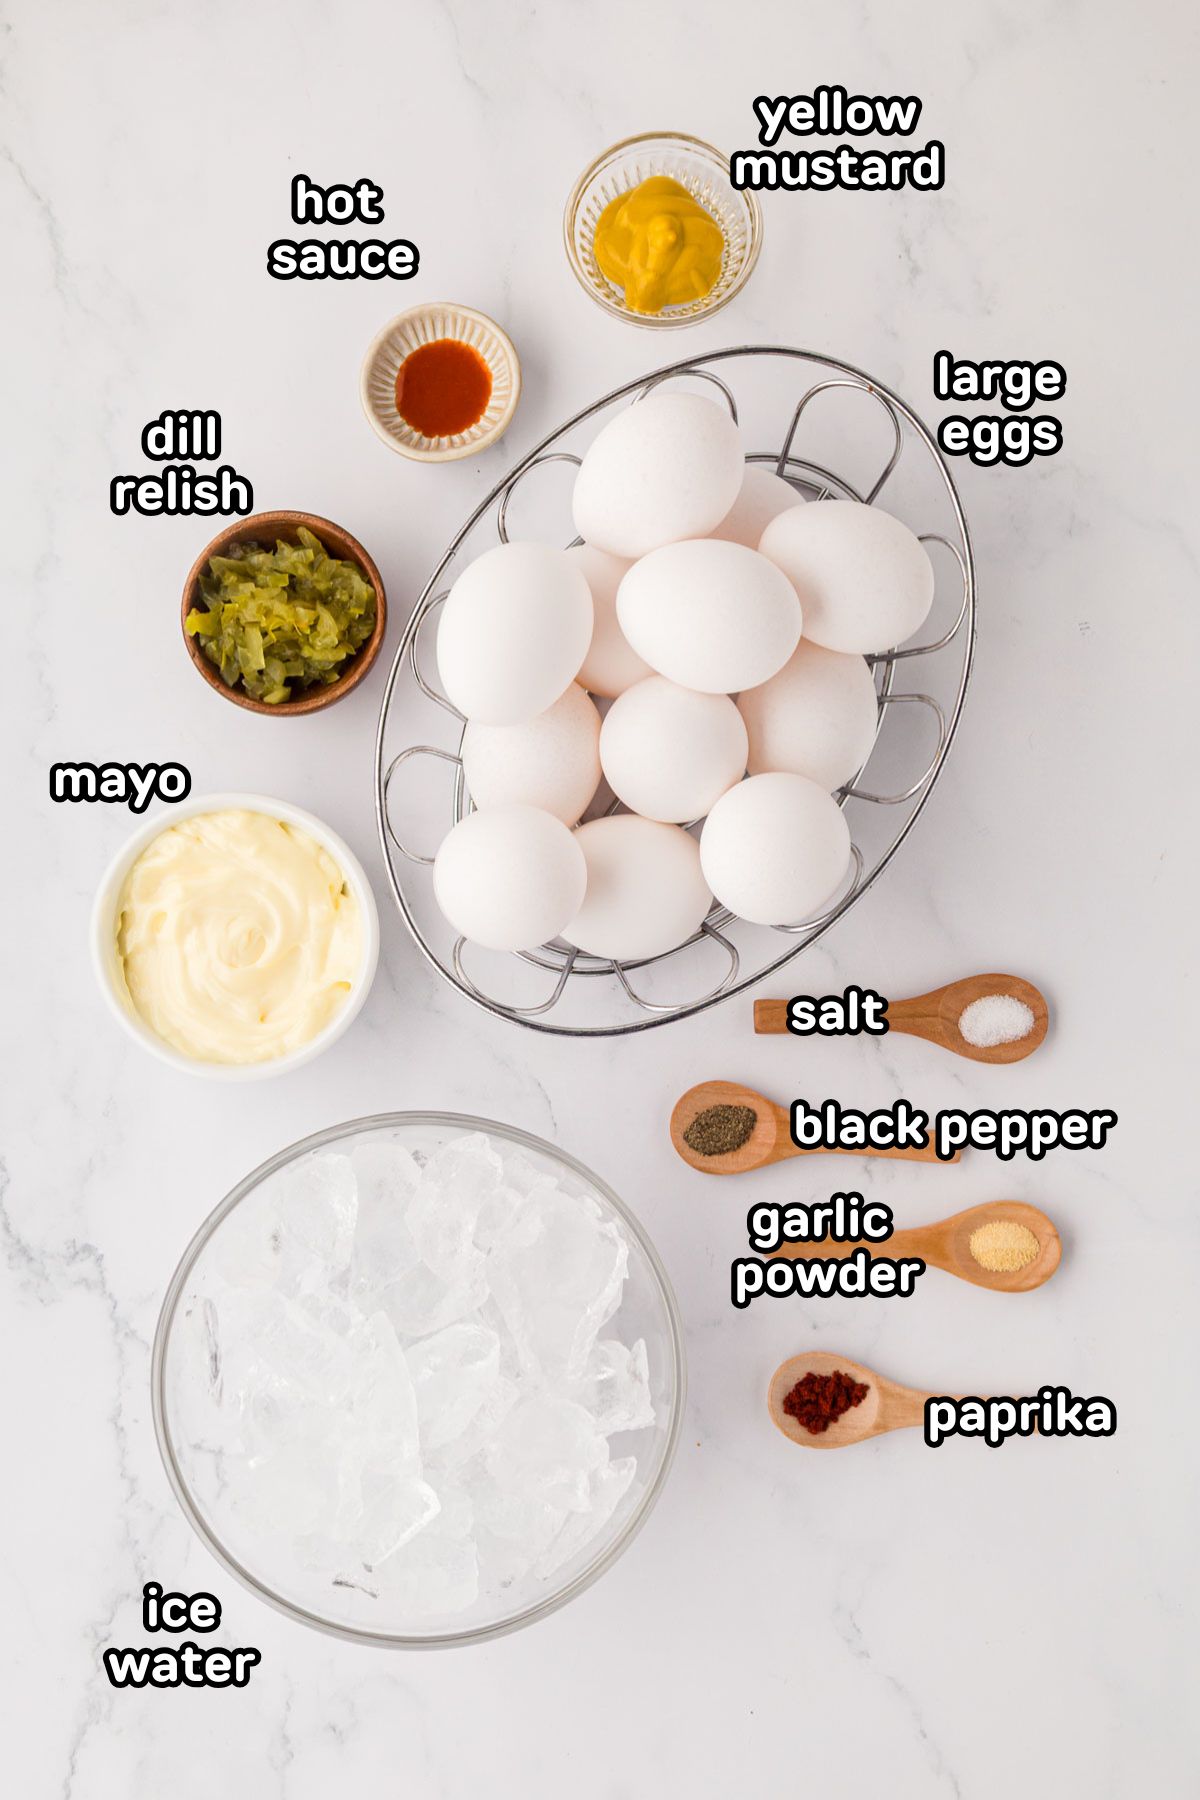
- Large Eggs: Steaming Eggs or Boiling Eggs in the Instant Pot helps with easy peeling.
- Mayonnaise: Provides creaminess; (I love Dukes brand) adjust to the consistency you like.
- Dill Relish: Adds a tangy crunch; sweet relish can be used.
- Yellow Mustard: Gives a classic tang.
- Garlic Powder: Optional; adds a subtle depth of flavor.
- Salt & Black Pepper: Season to taste.
- Hot Sauce: adds a spicy kick if you desire.
- Paprika & Coarse Cracked Black Pepper: For garnish; adds color and an earthy peppery finish.
Ways to Make Hard-Boiled Eggs Easy to Peel
The biggest game-changer when it comes to peeling eggs easily? The cool-down, aka ice bath! No matter how you cook them – boiled on the stovetop, steamed, or in the Instant Pot – I’m giving you the foolproof method for each below. Removing them straight into an ice water bath is key. That quick chill stops the cooking process and helps separate the membrane from the shell, making peeling a whole lot less frustrating.
The Instant Pot is my personal favorite. Not only is it hands-off and super consistent, but the shells practically slide off. It’s my go-to when I need a whole batch done quickly and without the headache.
Steaming comes in close behind. It’s gentle, and the eggs cook evenly without overboiling. Bonus? You don’t need much water, and the shells come off beautifully.
Traditional boiling still works, especially if it’s what you’re used to. Just be sure not to skip that ice bath – it’s the real MVP here. Give the eggs at least 14-15 minutes in cold water, and you’ll have eggs that are cool, easy to handle, and ready to peel without too much of a fight.
How to Make Deviled Eggs with Relish
✱ Below shows step-by-step photos and instructions. For the complete recipe, along with ingredient amounts, scroll down to the recipe card.
1. Cook the Eggs:
- Stovetop Boiling: Place eggs in a pot and cover with cold water by about an inch. Bring to a boil over high heat, then turn off the heat and cover. Let them sit for 10–12 minutes—10 minutes for a creamier yolk, 12-15 for a firmer center.
- Stovetop Steamed Eggs: Add about 1 inch of water to a saucepan and insert a steamer basket. Bring water to a boil, place eggs in the basket, cover, and steam for 12–15 minutes.
- Instant Pot Boiled Eggs: Place a trivet in the Instant Pot and add 1 cup of water. Place eggs on the trivet, seal the lid, and cook on high pressure for 5 minutes. Allow a 5-minute natural release, then quick-release any remaining pressure.
Whichever method you use, after cooking, transfer eggs to an ice bath to cool.
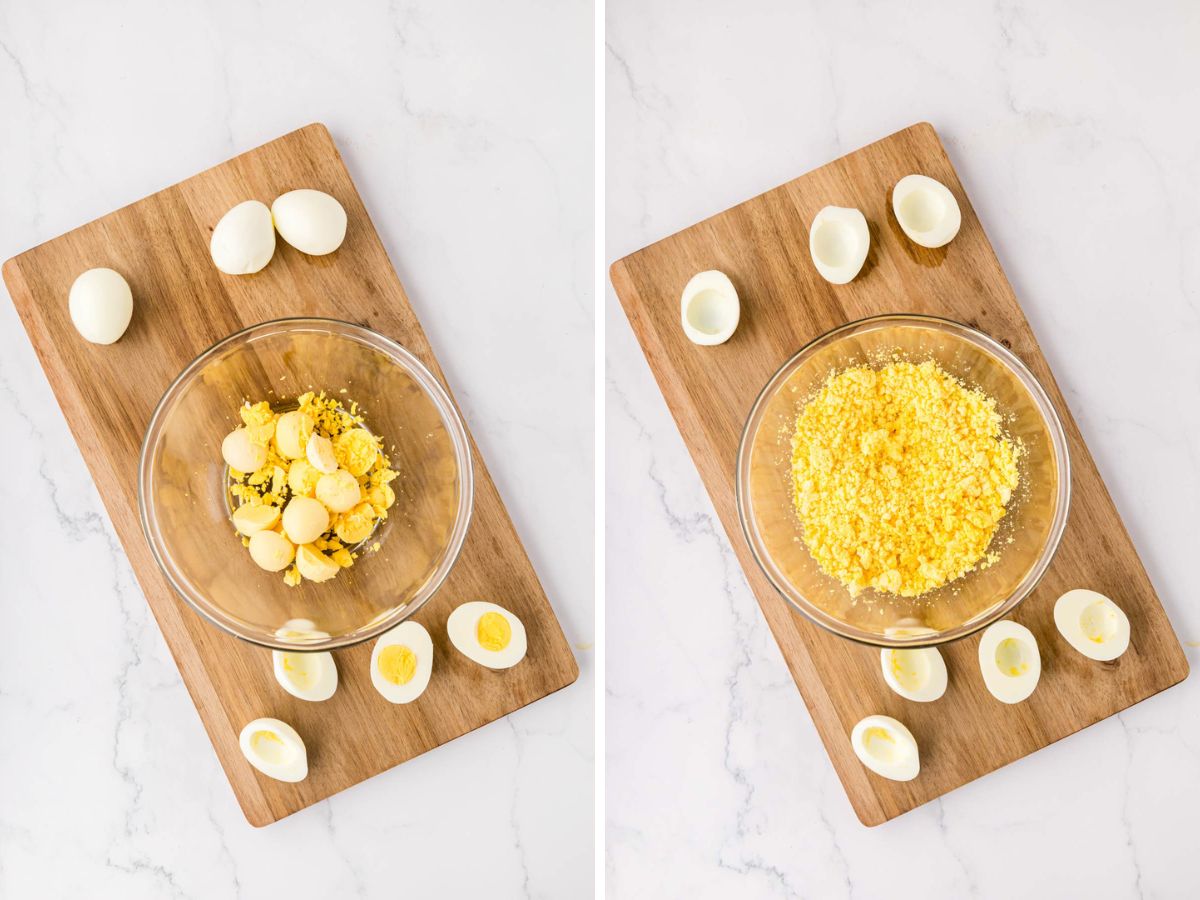
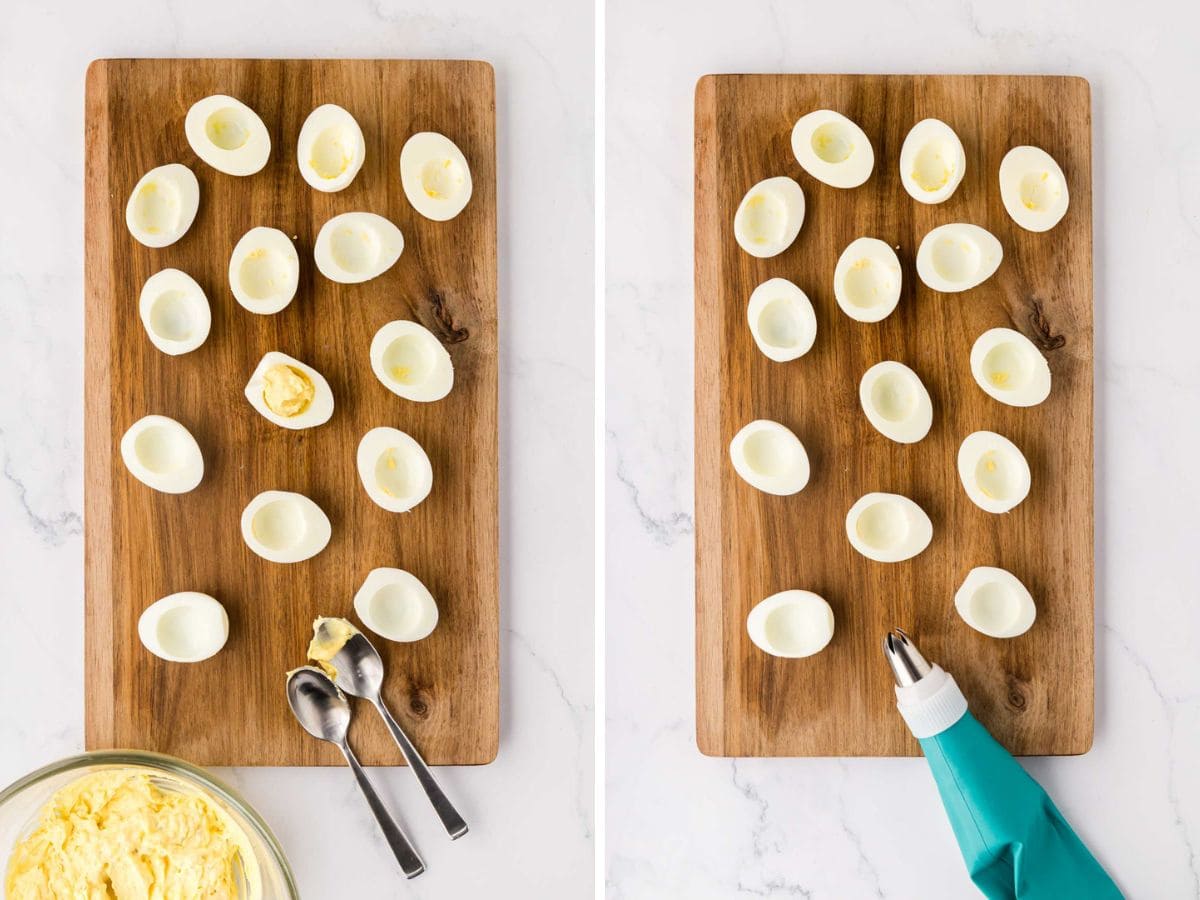
2. Prepare the Filling:
Peel the cooled eggs and slice them in half lengthwise. Remove yolks and place them in a bowl, and mash the yolks with a fork.
Pro Tip:
For extra-smooth filling, push the cooked yolks through a fine mesh sieve or give them a quick blend in a food processor. It breaks down any little bits and gives you that light, velvety texture that pipes beautifully and tastes even better.
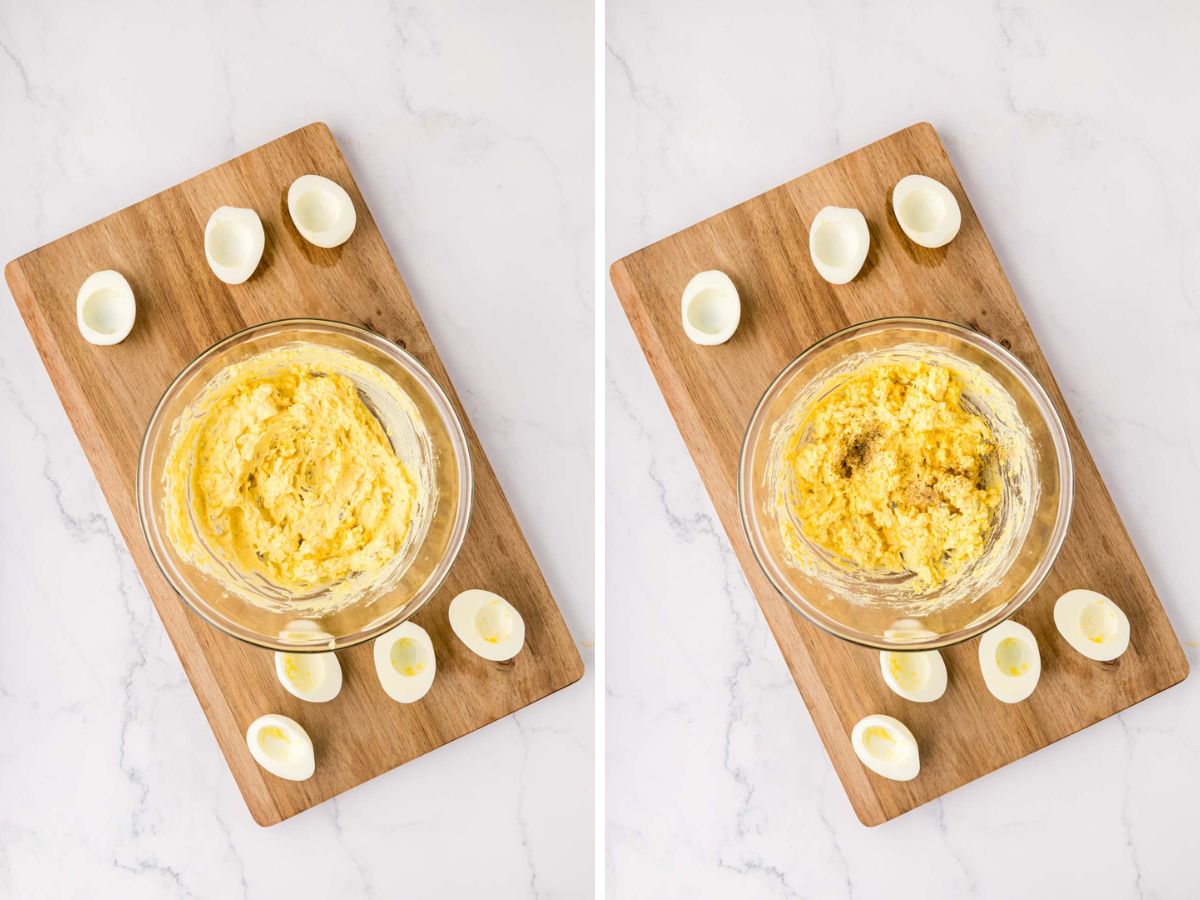
Then add mayonnaise, mustard, relish, garlic powder (if using), salt, pepper, and hot sauce (if using). Mix until smooth.
3. Assemble the Deviled Eggs:
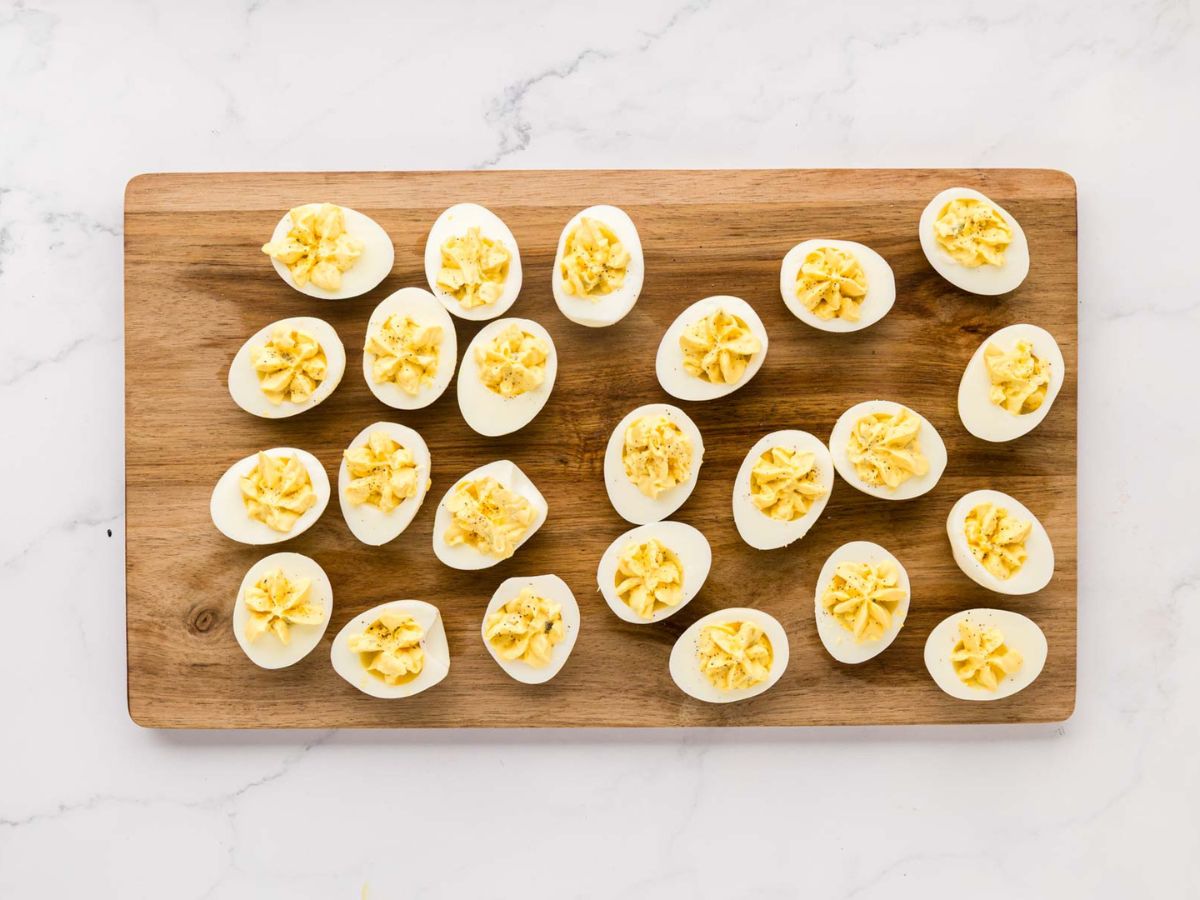
Spoon or pipe the yolk mixture back into the egg white halves.
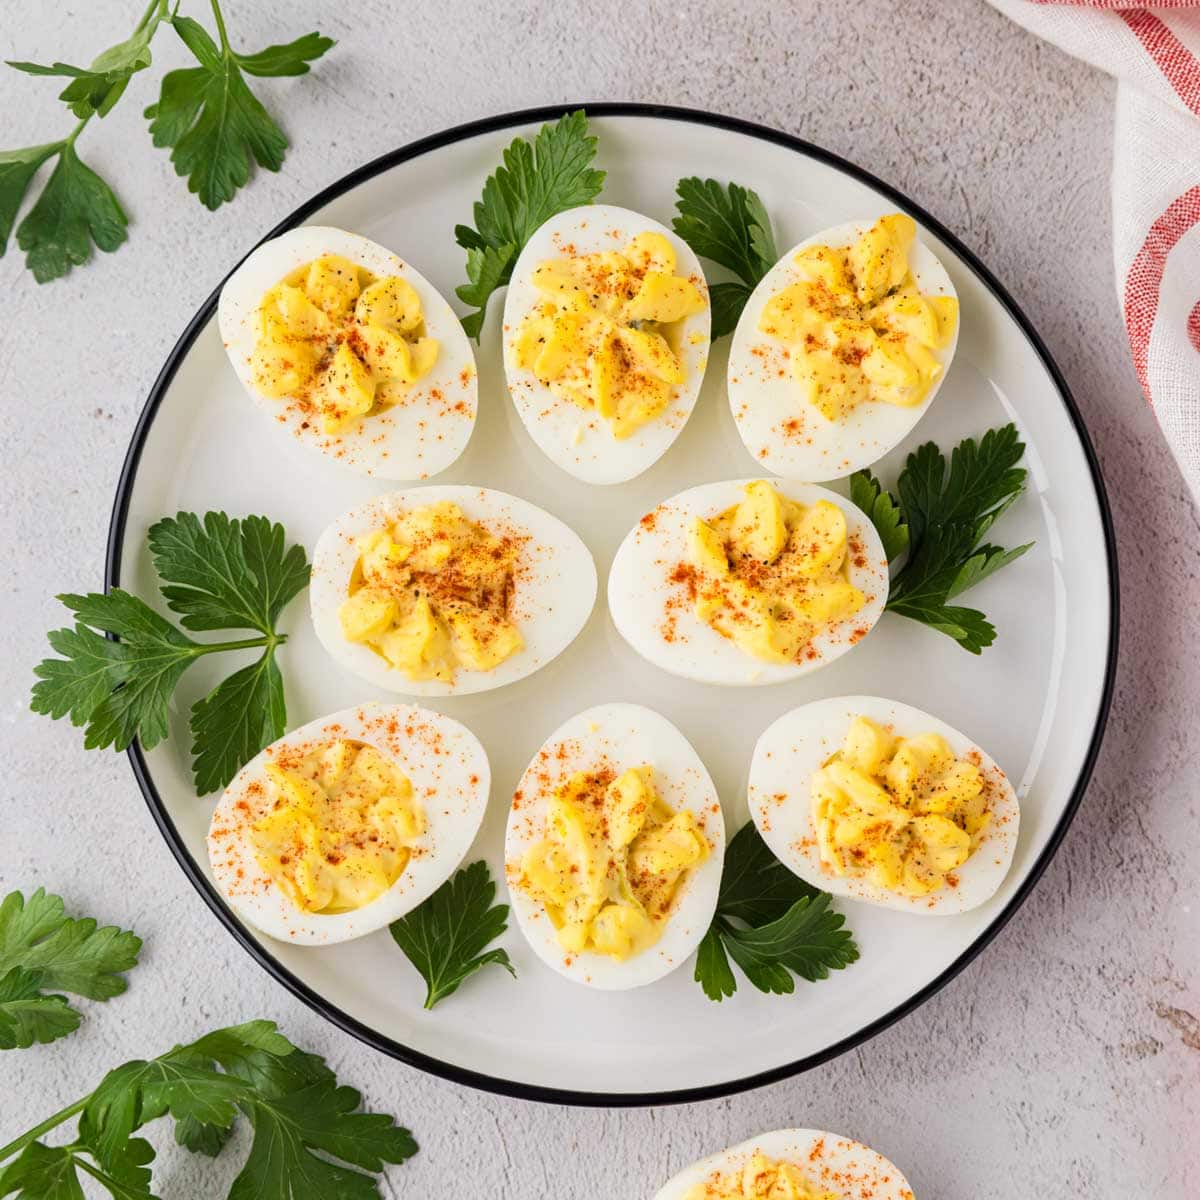
Garnish with paprika and coarse cracked black pepper.
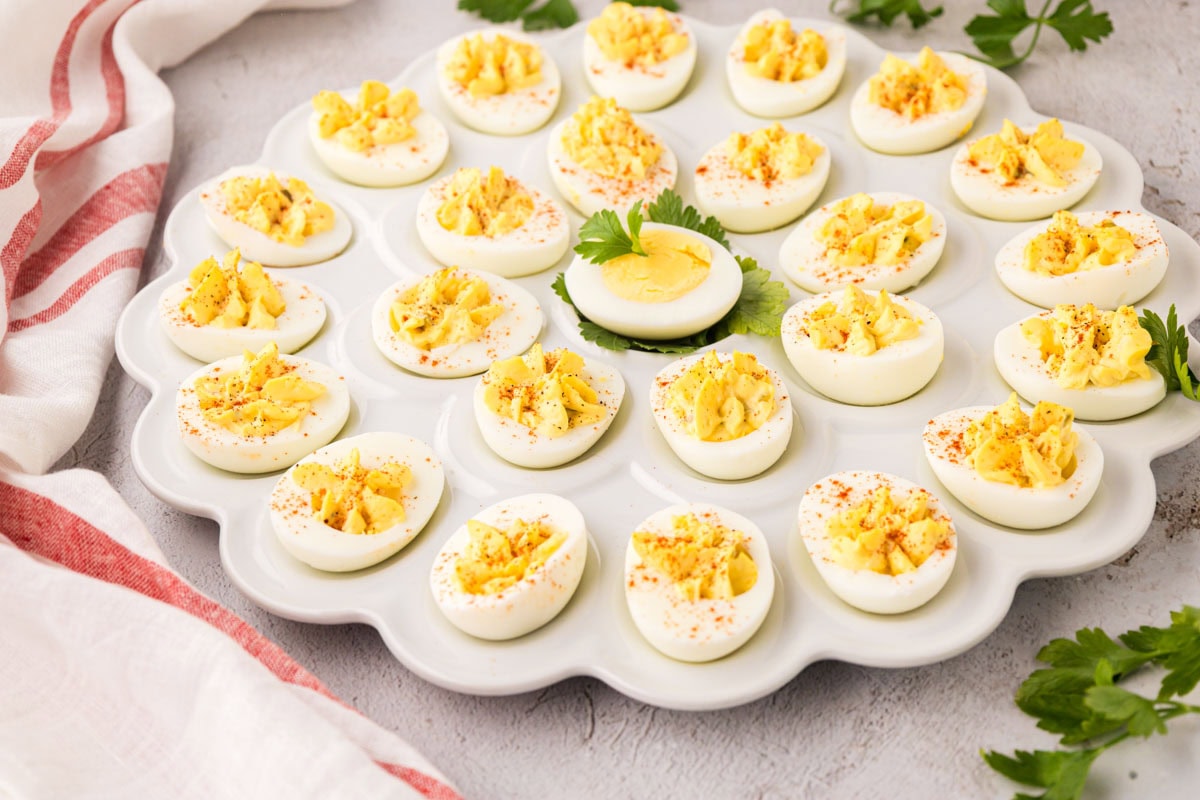
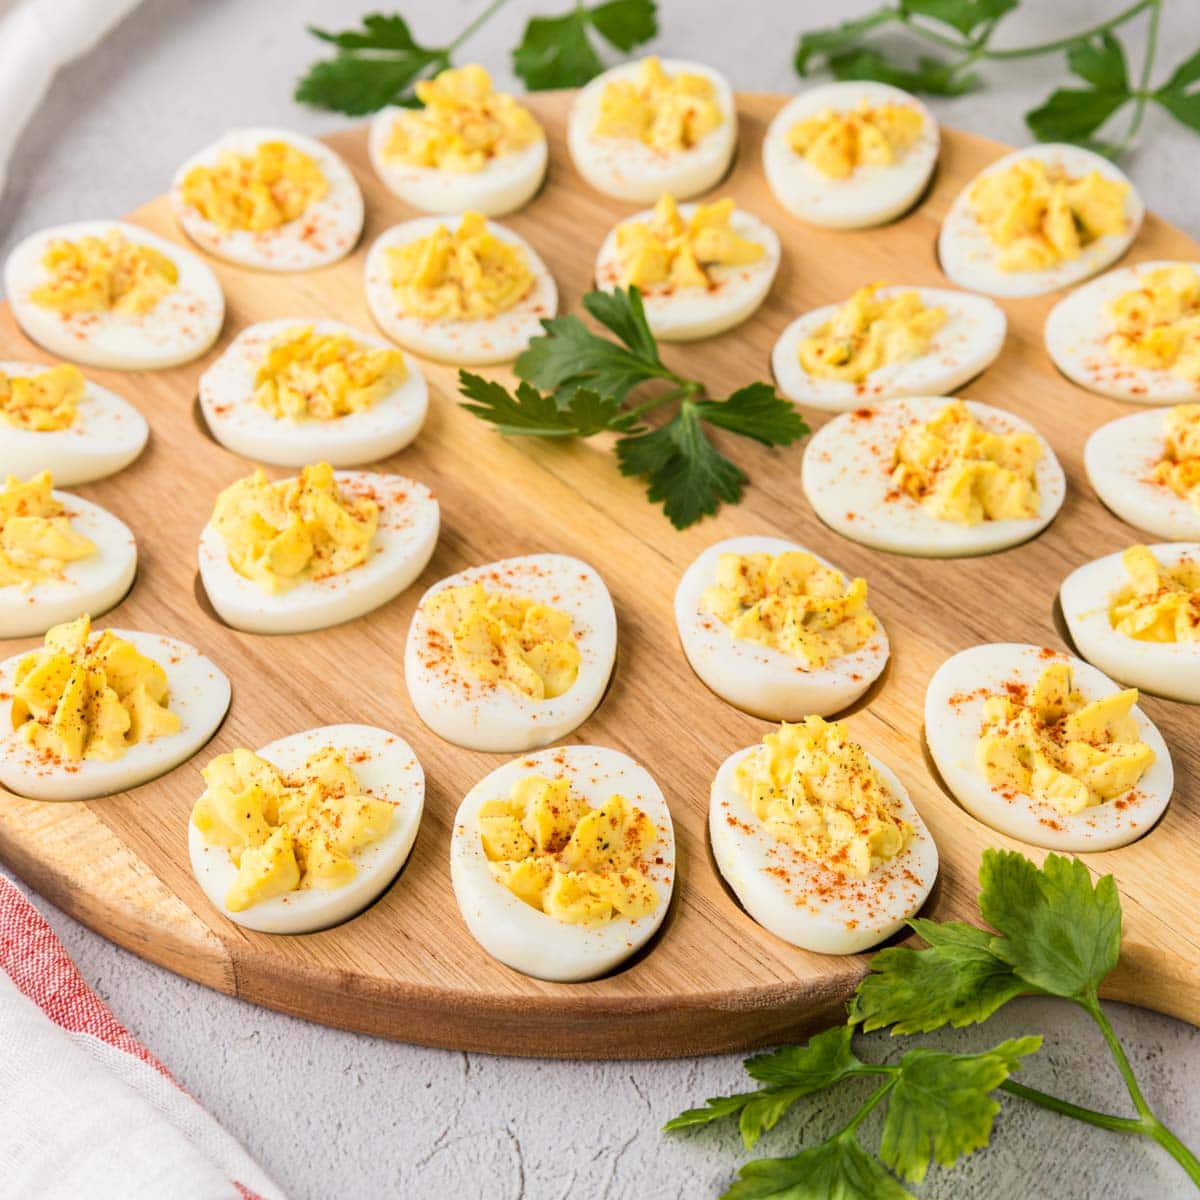
4. Serve and Enjoy:
Arrange the deviled eggs on a serving platter and enjoy!
Expert Tips
- When it comes to filling deviled eggs, you can easily spoon the filling in (just like my mama did). If you want to get fancier, use a ziptop bag to pipe the filling in or a pastry bag with a star tip is easy too!
- Don’t overcook the eggs. This will make them difficult to peel and also make the outer rim of the yolk discolored.
- Customize the filling to your liking. You can easily add other fresh herbs, spices, even proteins like crab or cooked bacon for a twist!
- If you’re short on time, buy pre-cooked hard boiled eggs from the store. While it’s not my favorite method, it still works and reduces the prep time by half.
What to Serve with Deviled Eggs
I’m not trying to exaggerate, but they are one of those dishes that just go with everything. They’re a staple on just about every holiday table—right next to the ham, turkey, or roast, nestled between the macaroni and cheese and green beans. They show up at cookouts too, holding their own alongside smoky barbecue, baked beans, and potato salad.
They’re also perfect for brunch spreads, paired with buttery biscuits, breakfast casseroles, or even shrimp and grits if you’re feeling fancy.

FAQs
You can definitely get ahead, but I always recommend waiting to fill them until the day of. You can cook, peel, and even slice the eggs a day ahead, and mix up the filling too. Store the white and yolk mixture separately in airtight containers in the fridge. Then, when you’re ready to serve, pipe or spoon the filling in. This keeps the whites from getting watery and helps everything taste fresh and look its best.
I wouldn’t recommend it. The texture of the egg whites changes in the freezer and just doesn’t hold up. For the best flavor and texture, stick to the fridge.
If you’re taking them to a gathering, a deviled egg carrier is your best friend. If you don’t have one, place them in a container lined with paper towels to help keep them in place. Assemble just before you go, or keep the filling and whites separate and put them together when you arrive.
More Simple Appetizers
Hungry for more easy, home-cooked, delicious recipes?
Sign up for my free recipe club to get family-friendly recipes in your inbox each week! Find me sharing daily meal-time inspiration on Pinterest, Facebook, and Instagram.
Southern Deviled Eggs with Relish
Click Stars To Rate
Ingredients
- 12 large eggs
- ⅓ cup mayonnaise - add more to taste 1 tablespoon at the time after mixing
- 2 tablespoons dill relish - (if you prefer sweet relish you can use that)
- 1 ½ teaspoons yellow mustard
- ⅛ to ¼ teaspoon garlic powder - (optional)
- ¼ teaspoon salt - or to taste
- ¼ teaspoon black pepper - or to taste
- dash hot sauce - (optional) or to taste
- paprika - for garnish
- coarse cracked black pepper - for garnish
Instructions
- Stovetop Boiling: Place eggs in a pot and cover with cold water by about an inch. Bring to a boil over high heat, then turn off the heat and cover. Let them sit for 10–12 minutes—10 minutes for a creamier yolk, 12-15 for a firmer, more set center. Let them cool in an ice bath.Stovetop Steaming: Steaming is my favorite trick for perfectly cooked, easy-to-peel eggs! Just pour about 1 inch of water into a medium saucepan, then add the steamer basket. Bring the water to a boil over medium-high heat, then gently place the eggs in the pan. Cover the pot with a tight-fitting lid, bring it back to a boil, and steam for 12 to 15 minutes. Let them cool in an ice bath, and they’ll peel like a dream. 👉 For a step-by-step guide with all my best tips, check out my full post HOW TO STEAM HARD-BOILED EGGSInstant Pot Boiled Eggs: Add 1 cup of water to the Instant Pot. Add a wire rack and place eggs on top. Cook on high pressure for 5 minutes, with a 5-minute natural release. Remove eggs to an ice water bath. 👉 For a step-by-step guide with all my best tips, check out my full post INSTANT POT BOILED EGGS:
- Peel and cut eggs: Slice peeled eggs in half, lengthwise. Carefully remove the yellow yolks and place them in a large bowl. Use a fork to mash the yolks.
- Make Filling: To the bowl of mashed yolks, add mayonnaise, mustard, pickle relish, garlic powder, and hot sauce (if using). Mash with a fork until smooth, and mix until combined. Add salt and pepper (if using) to taste. Add more mayo, mustard, or seasonings to taste, if needed.
- Assemble & Garnish: Spoon or pipe the mixture equally back into the whites. Garnish with coarse ground black pepper and paprika, if you like.
Want to Save this Recipe?
By submitting this form, you consent to receive emails from Soulfully Made.