
This post may contain affiliate links. Please read our disclosure policy.
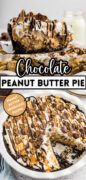
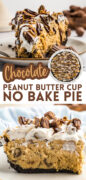
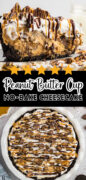
If you’re a peanut butter and chocolate lover, this no-bake Peanut Butter Cup Pie is going to steal your heart! It’s rich, creamy, and loaded with all the good stuff—Oreo crust, fluffy peanut butter filling, and plenty of mini Reese’s on top. Best of all, it’s easy to make and perfect for any occasion (or no occasion at all!).

What People Are Saying
⭐️⭐️⭐️⭐️⭐️
“Do NOT pass up making this pie! It’s fantastic! I’ll be making my 4th pie this year from this recipe! Everyone loves it!”
— Dee
The Secret to the Best Ever Peanut Butter Pie

When the kids (and adults) are scraping the plate clean and asking if there’s more, you know you’ve made something special. This pie is one of those easy wins—no baking required, just a handful of simple ingredients —and it always receives rave reviews.
Every time I make it, someone’s asking for the recipe. It’s the kind of dessert that feels like you spent way more time on it than you did (and we love that kind of kitchen magic).
Here’s what makes it irresistible!
❥ No-Bake & Stress-Free: Just mix, pour, and chill. No oven, no fuss—just simple steps anyone can do.
❥ Loaded with Peanut Butter Goodness: Creamy filling, rich Oreo crust, and plenty of Reese’s on top.
❥ Picture-Perfect Dessert: That whipped topping swirl and Reese’s candy on top make it look just as amazing as it tastes.
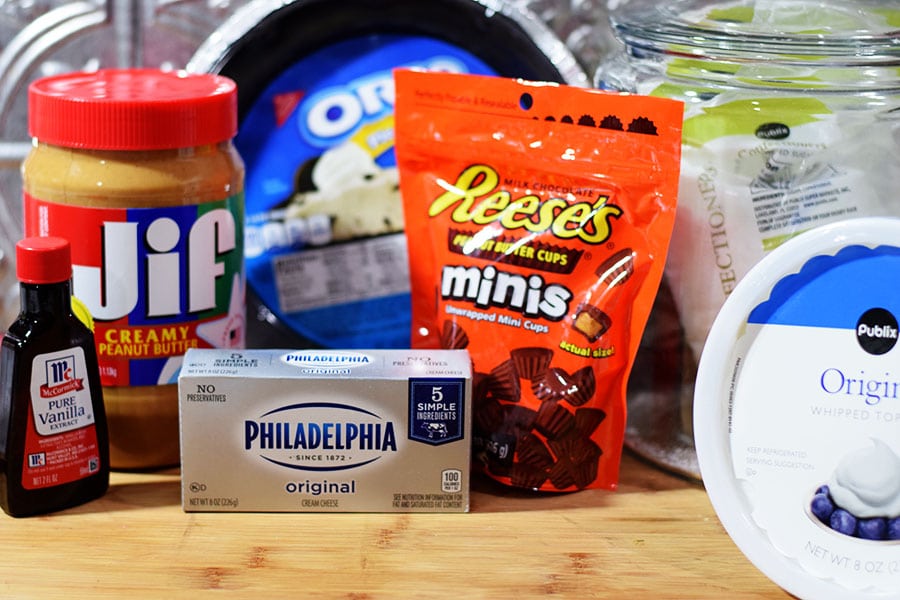
NikkiReese’s Peanut Butter Pie Ingredients
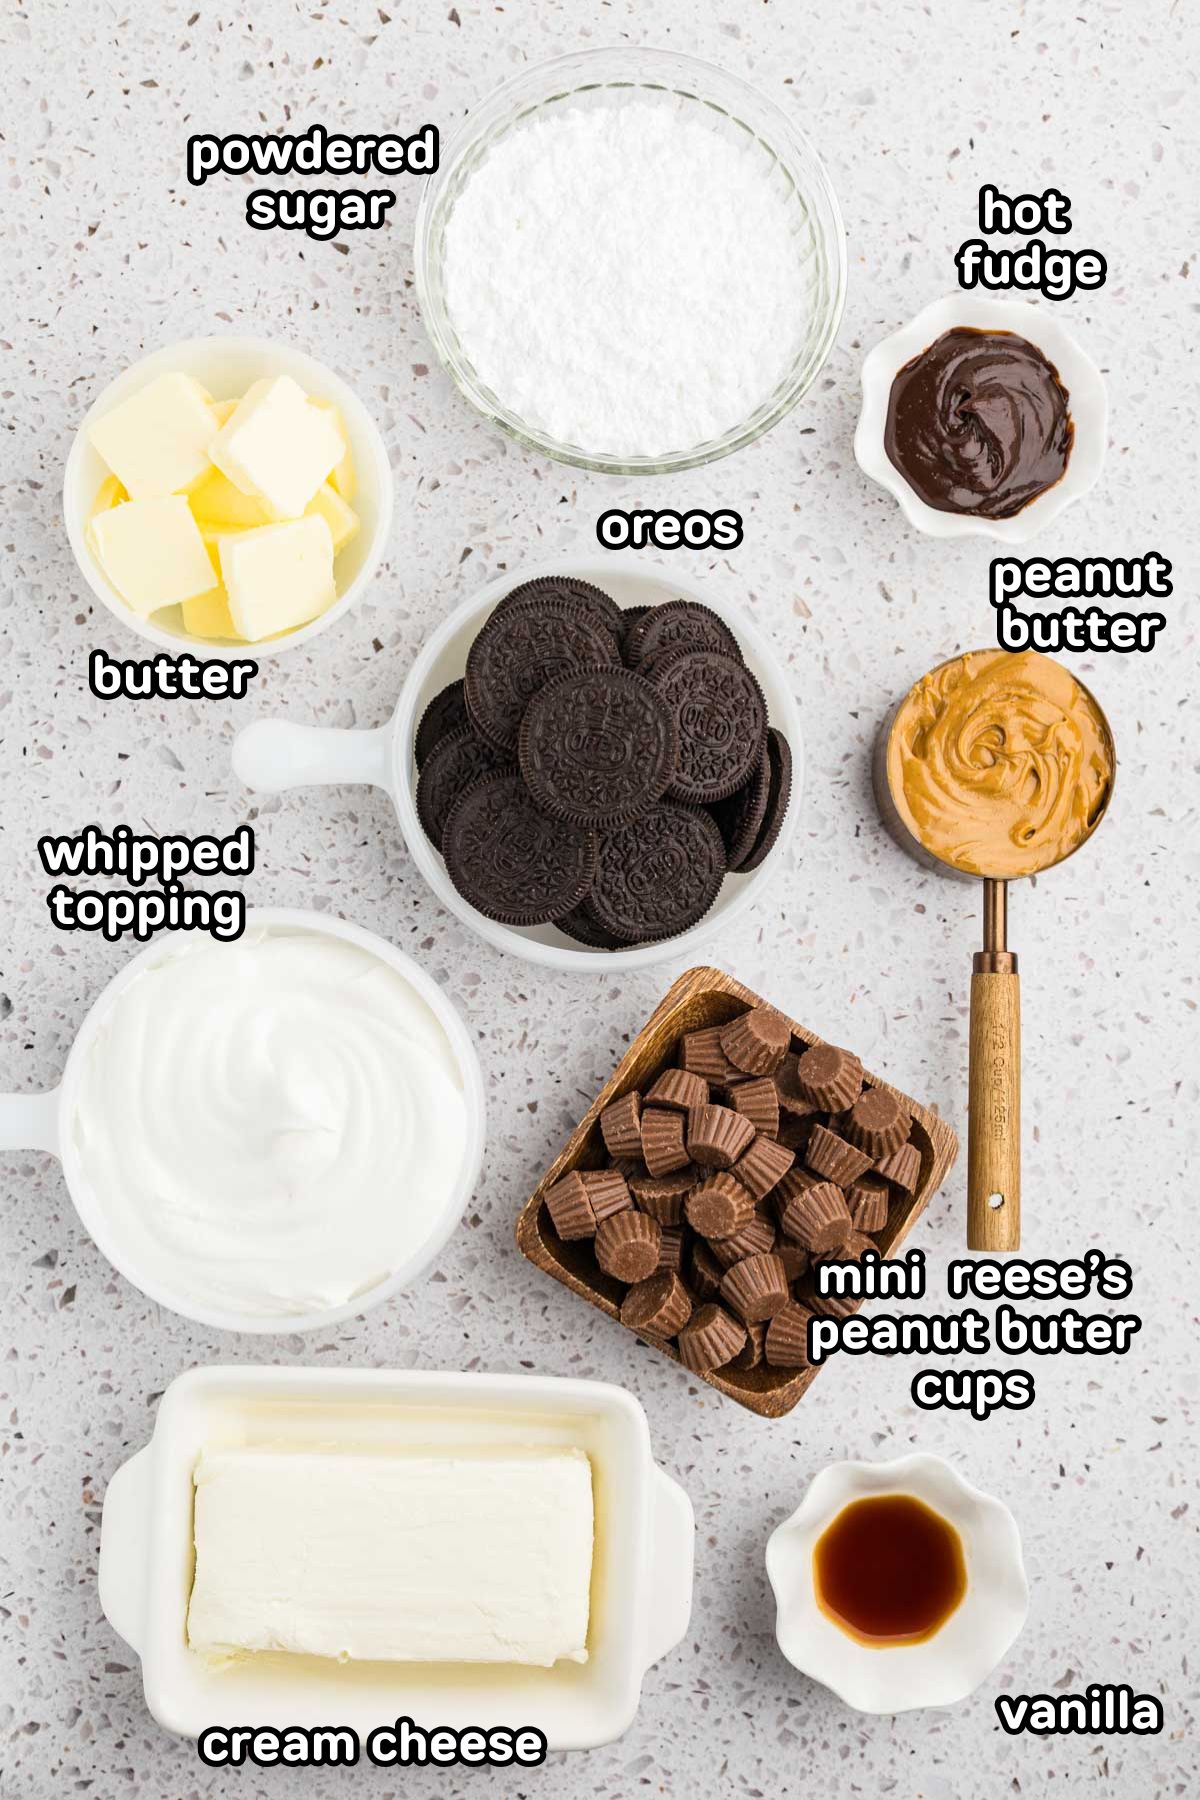
Oreo Pie Crust
- Oreo Cookies – Use classic Oreos with filling included. They help bind the crust. I don’t suggest using the Thins, Double Stuff, or Mega Stuff cookies.
- Butter – Melted and mixed to hold the crust together. Salt adds extra flavor.
Shortcut Tip: You can also use a store-bought Chocolate Cookie Pie Crust if you prefer.
Peanut Butter Filling
- Cream Cheese – Softened to room temperature so it blends smoothly, with no lumps.
- Peanut Butter – Go with creamy for a velvety filling that mixes easily. I always use Jif, but use your favorite.
- Powdered Sugar – Sweetens the filling without making it gritty.
- Vanilla – A splash brings everything together with cozy flavor.
- Mini Peanut Butter Cups – I buy the unwrapped mini peanut butter cups. I like the ratio of chocolate to peanut butter in them for this pie. You will need two 7-ounce bags for this recipe to top as in the images. Over the years, the package has become smaller, so if you prefer to use regular chopped Reese’s Cups in the filling, you can. The mini ones are prettier (IMO) for the topping.
- Frozen Whipped Topping – Thawed and folded in for a light, fluffy texture. I like to use extra creamy or Cool Whip brand. Lately I have found my store brand to be a little looser and not as firm and thick.
Toppings
- Mini Reese’s – Roughly chopped, but also leave some of them whole for a sweet peanut buttery crunch.
- Hot Fudge & Melted Peanut Butter – Optional, but highly recommended for that finishing drizzle!
How to Make Peanut Butter Chocolate Pie
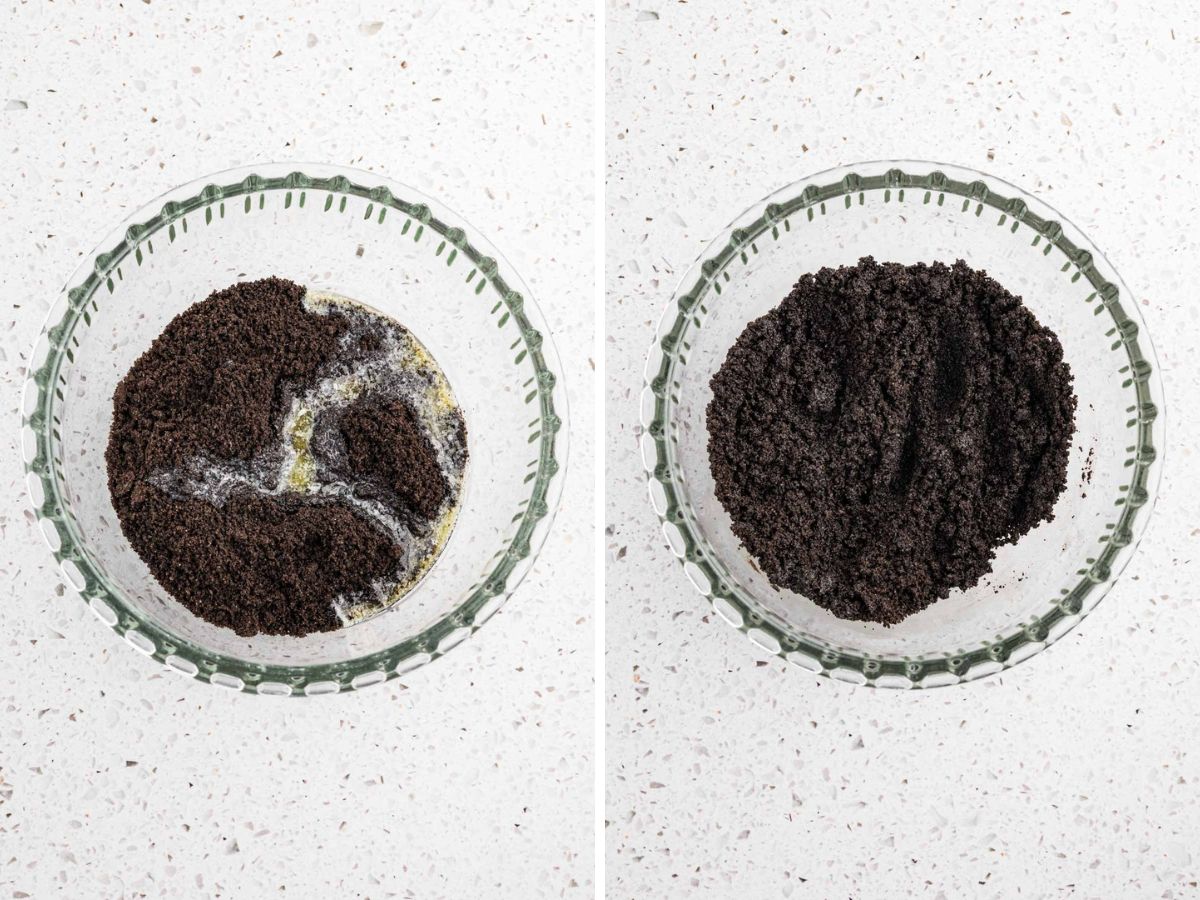
Step 1 | Make the Oreo Crust (or you can buy a premade chocolate or Oreo pie crust)
Add the whole Oreo cookies (yep, filling and all!) to a food processor and pulse until you’ve got fine crumbs—about 30 to 45 seconds.
Transfer the crumbs to a bowl and stir in melted butter until everything is coated and comes together like damp sand.
Press the mixture evenly into the bottom and sides of a 9-inch pie dish. I like to use the bottom of a ¼-cup measuring cup to press it down firmly.
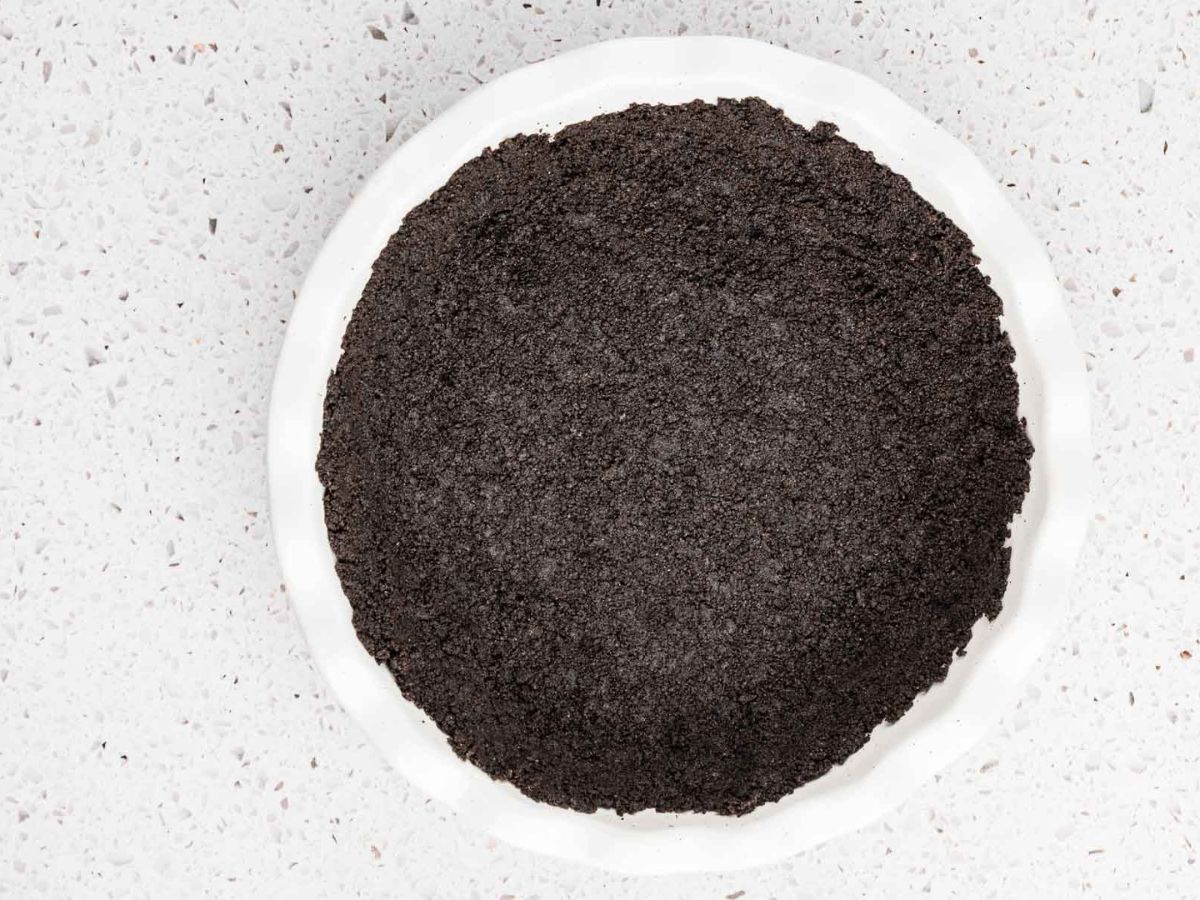
Pop the crust in the freezer for 30 minutes so it sets up nicely.
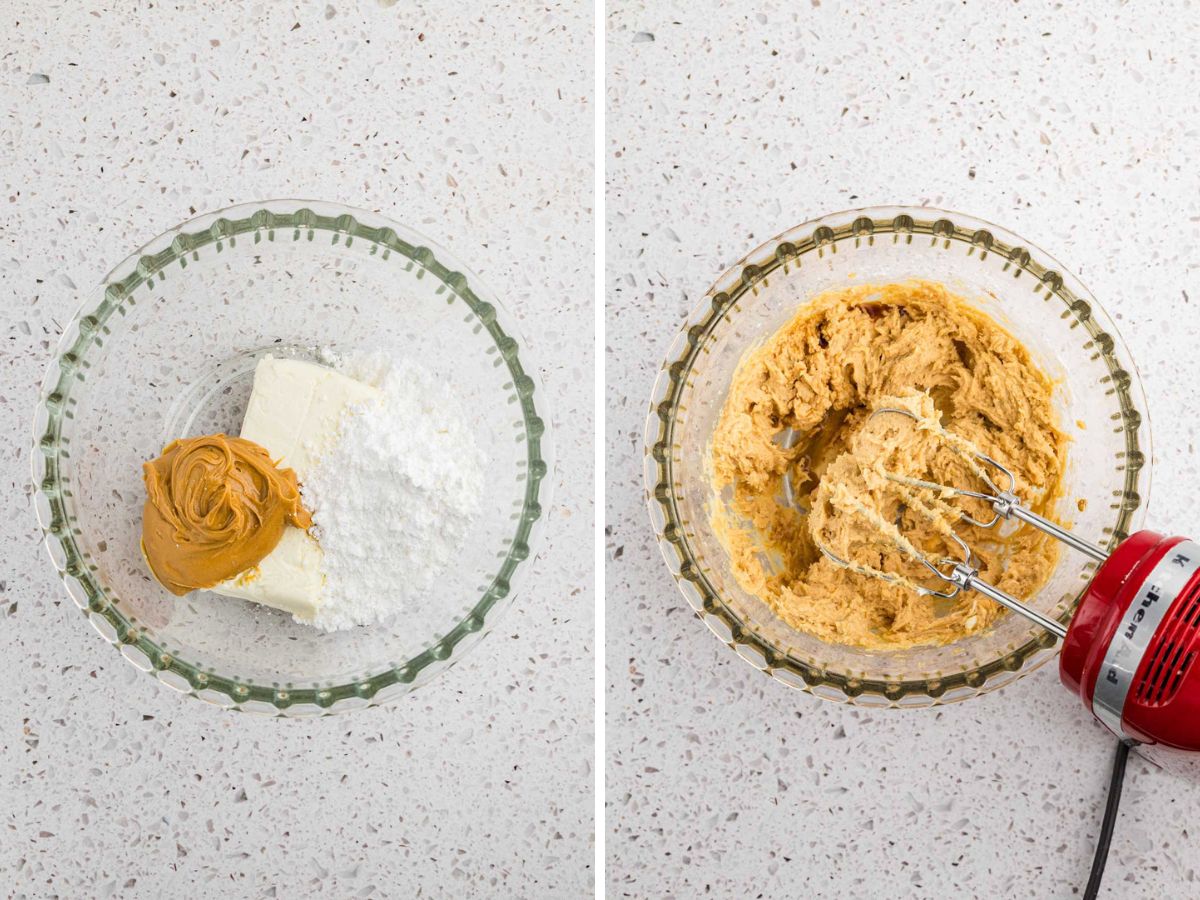
Step 2 | Mix the Creamy Peanut Butter Filling
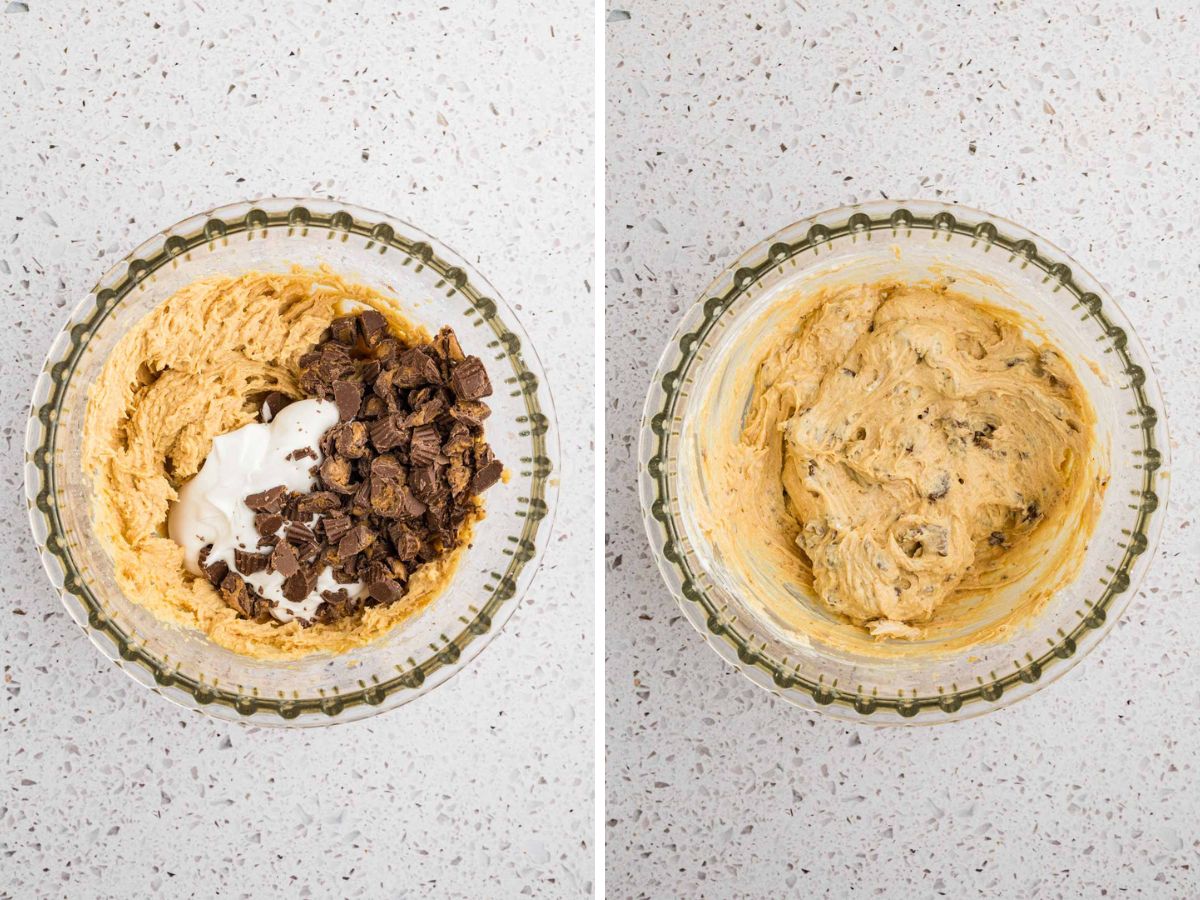
In a stand mixer (or with a handheld mixer), beat the softened cream cheese, peanut butter, and powdered sugar until smooth and creamy. Add in the vanilla and mix just until combined.
Fold in 8 ounces of whipped topping gently until the mixture is light and fluffy.
Step 3 | Assemble the Pie
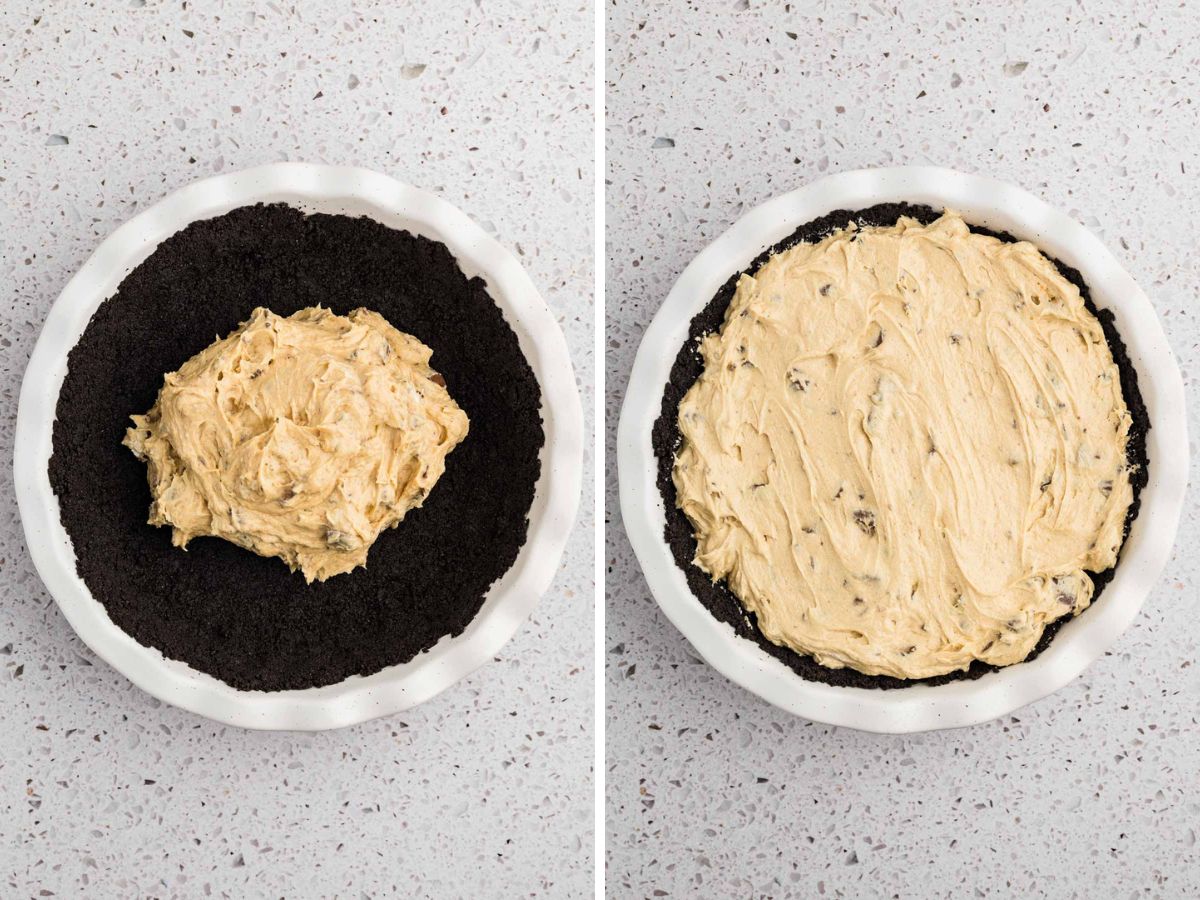
Spoon the peanut butter filling into the chilled crust and smooth it out evenly with a spatula.
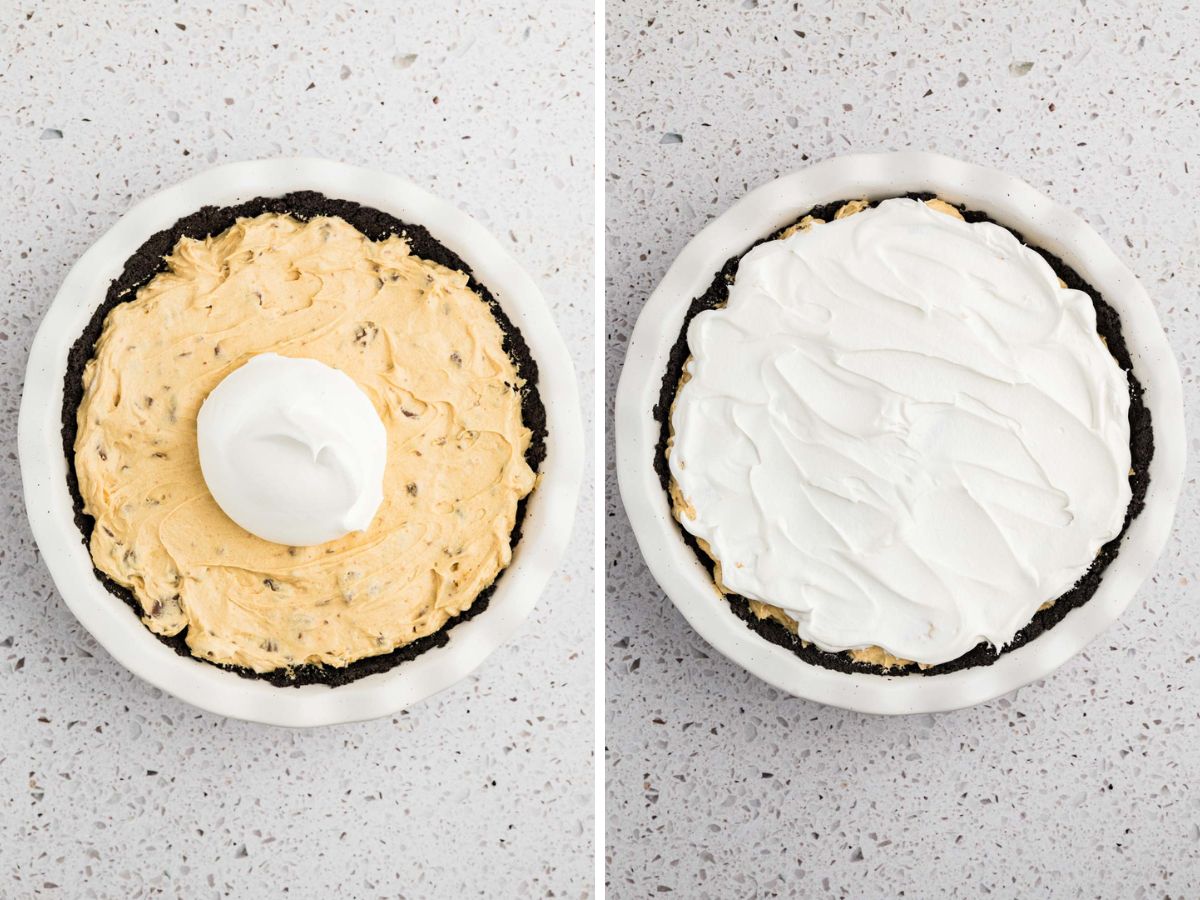
Spread the remaining whipped topping over the top.
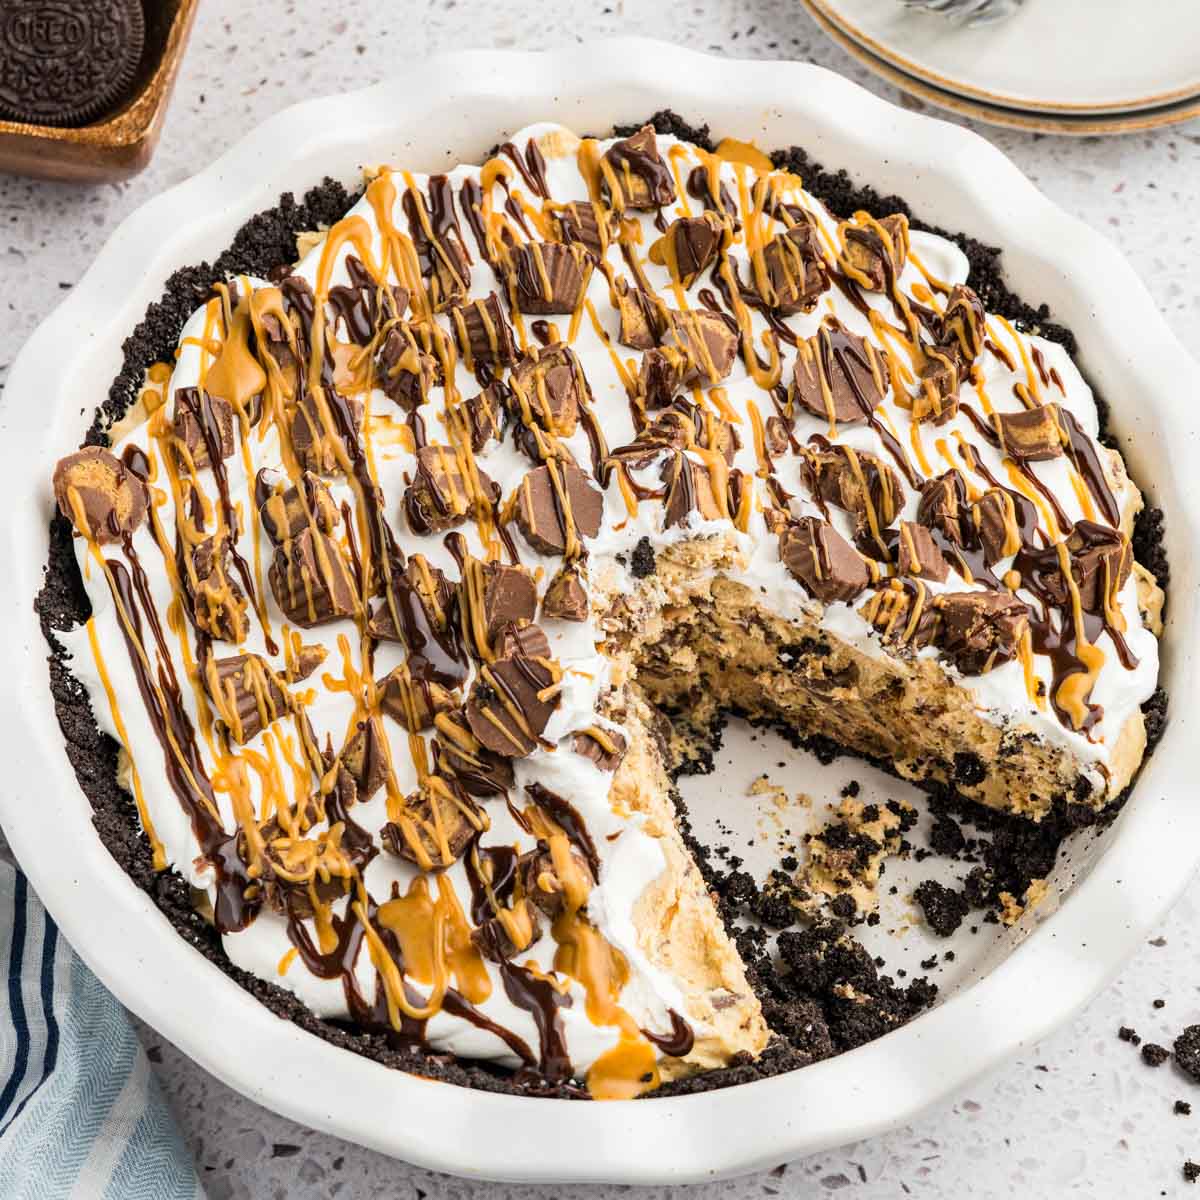
Sprinkle chopped mini Reese’s all over—saving a few whole ones for a pretty finish.
Step 4 | Chill and Serve
Refrigerate the pie for at least 4 hours (overnight is even better) until it’s nice and firm.
Before serving, drizzle with warm hot fudge and melted peanut butter if you’d like that extra indulgent touch

Chocolate Peanut Butter Pie Recipe Tips
- I buy the unwrapped mini peanut butter cups. I like the ratio of chocolate to peanut butter in them for this pie. You will need two 7-ounce bags for this recipe if you top the pie as pictured, but you can get by with 1 bag. Over the years, the package has become smaller, so if you prefer to use regular chopped Reese’s Cups in the filling, you can. The mini ones are prettier (IMO) for the topping.
- Room Temp Cream Cheese: Don’t skip this step! Cold cream cheese won’t blend smoothly and could leave lumps in your filling.
- Use a Measuring Cup to Press the Crust: A flat-bottomed ¼ cup works perfectly to press the crust evenly into the pie dish, giving it a nice, polished look.
- Freeze the Crust: This helps it firm up and stay together in place of baking for a true no-bake recipe.
- Whipped Topping: I prefer using extra creamy or Cool Whip brand. Lately I have found my store brand to be a little looser and not as firm and thick. Homemade Whipped Cream can be whipped a little firmer, adding a delicious texture and a homemade taste.
- Chill Time Is Key: Give the pie enough time to chill—at least 4 hours. I prefer all day or overnight. This helps everything set up beautifully and slice cleanly.
- Want those nice, clean bakery-style slices? After topping with whipped topping, place the pie in the freezer for about an hour before serving. It firms up just enough to cut beautifully. Use a sharp knife, and wipe it clean between slices for the prettiest presentation!

Peanut Butter Chocolate Pie Variations
- Crust Option – Want a twist? Try a Nutter Butter crust for double the peanut butter punch. Just swap the cookies and make the crust the same. Or try a chocolate chip cookie crust.
- Chocolate Lovers – Mix mini chocolate chips or chopped dark chocolate into the filling for extra chocolatey goodness.
- Topping Fun – Swap Reese’s for chopped Snickers, Butterfingers, or even M&Ms if that’s what you’ve got on hand.
- Whipped Topping Swap – You can use homemade whipped cream if you prefer (just beat heavy cream with a little powdered sugar until stiff peaks form).
- Mini Pies – Press the crust mixture into cupcake liners in a muffin tin for adorable individual servings—great for parties!
What to Serve with Reeses Peanut Butter Cup Pie
- Peanut Butter S’mores Cookies: Gooey marshmallows, Reese’s minis, and graham crackers make these cozy cookies a perfect companion, especially if your pie is already peanut butter forward.
- Nutty Buddy (No‑Churn) Ice Cream: A creamy, peanut butter & chocolate ice cream that you can scoop next to a slice of pie. Extra hugs with hot fudge or caramel on top!
- Easy Coconut Cream Pie: The light, tropical creaminess of coconut gives a refreshing contrast to the indulgent peanut butter pie
Hungry for more easy, home-cooked, delicious recipes?
Sign up for my free recipe club to get family-friendly recipes in your inbox each week! Find me sharing daily meal-time inspiration on Pinterest, Facebook, and Instagram.
Reese’s Peanut Butter Cup Pie Recipe
Click Stars To Rate
Ingredients
- 24 Oreo cookies - (with filling)
- 4 tablespoons butter - melted
- 8 ounces cream cheese - softened to room temperature
- ½ cup peanut butter - creamy
- ¾ cup powdered sugar
- 1 tsp vanilla
- 8 ounces frozen whipped topping - thawed
- 12 – 14 ounces mini reese's peanut butter cups - divided, you can use 6 to 7.8 ounces (a whole bag) for the filling, or to taste
- 8 ounces whipped topping - (or homemade whipped cream)
- mini reese's peanut butter cups - use the remaining mini peanut butter cups (leave a few whole)
- hot fudge topping
- melted peanut butter
Instructions
- Pulse the Oreos (filling included) in a food processor until you get fine crumbs, about 30 to 45 seconds. Add the crumbs to a large bowl. Add the melted butter and stir until the crumbs are well coated (this can also be done by pulsing the butter into the crumbs in the processor).
- Press the mixture into the bottom of an ungreased and of an ungreased of a 9-inch pie dish. I use a 1/4 cup dry measuring cup to press it flat.
- To set the crust, place it in the freezer for 30 minutes before adding the filling.
- In a stand mixer or with electric beaters, beat together very softened cream cheese, peanut butter, and powdered sugar until creamy, smooth and fluffy. Add vanilla and mix until combined. Fold in 8 ounces of whipped topping and chopped mini peanut butter cups.
- Refrigerate until completely chilled, for at least 4 hours to overnight before cutting to serve.
- Top with additional whipped topping or homemade whipped cream and some chopped up and whole mini Recee's Peanut Butter Cups
- Slice. Then, drizzle slices with hot fudge topping and melted peanut butter, if desired.
- Can be refrigerated for 4-5 days or frozen for 1 month.
Notes
- This recipe works best with classic Oreo cookies. I suggest not using the Thins, Double Stuff, or Mega Stuff cookies.
- You can use unsalted or salted butter. I use salted butter to balance the sweetness.
- For a Baked Oreo Pie Crust: Preheat the oven to 350°F. Make the pie crust as directed above (without freezing). Bake for 10 minutes, then cool completely before using.
- I buy the unwrapped mini peanut butter cups. I like the ratio of chocolate to peanut butter in them for this pie. You will need two 7-ounce bags for this recipe if you top the pie as pictured, but you can get by with 1 bag. Over the years, the package has gotten smaller, so if you want to use regular chopped Reece’s Cup in the filling, you can. The mini ones are prettier (IMO) for the topping.
- Room Temp Cream Cheese – Don’t skip this step! Cold cream cheese won’t blend smoothly and could leave lumps in your filling.
- Use a Measuring Cup to Press the Crust – A flat-bottomed ¼ cup works perfectly to press the crust evenly into the pie dish, making it look nice and polished.
- Freeze the Crust – This helps it firm up and stay together in place of baking the crust.
- Whipped Topping – I like to use extra creamy or Cool Whip brand. Lately I have found my store brand to be a little looser and not as firm and thick. Homemade Whipped Cream can be whipped a little firmer, adding a delicious texture and a homemade taste.
- Chill Time Is Key – Give the pie enough time to chill—at least 4 hours. I prefer all day or overnight. This helps everything set up beautifully and slice cleanly.
- Want those nice, clean bakery-style slices? After topping with whipped topping, place the pie in the freezer for about an hour before serving. It firms up just enough to cut beautifully. Use a sharp knife, and wipe it clean between slices for the prettiest presentation!
Want to Save this Recipe?
By submitting this form, you consent to receive emails from Soulfully Made.
I made this and it was delish! Gone in 24 hrs! Will definitely make again! A must try for peanut butter lovers!
Thank you, Donna! This is the best compliment ever! I love how easy this is to make and no one would believe it because it turns out so pretty and looks bakery worthy.
How many calories if I ate the whole pie? Asking for a friend… 😀
🤣 It’s peanut butter, so you know it’s healthy!
Is there a way to turn this into a 13×9 pan dessert?
Lisa, I have not but you could make your own crust. I have a cookie crust you could follow with Oreos (omit the sugar) and double. Then double or triple the filling depending on how thick you want it. I’d love to hear how it turns out.
Do NOT pass up making this pie! It’s fantastic! I’ll be making my 4th pie, this year, from this recipe! Everyone loves it!
Thank you so much, Dee! I appreciate your kind words! We love how easy it is to make along with the great taste!
I saw your recipe for the no bake peanut butter cup pie: it looks delicious. I was planning on making it for my daughter-in-law for her birthday :it’s
Wednesday. What kind of whipped topping are you recommending for
this–thawed Cool Whip, fresh whipped cream? I only want to go to the
store once because of COVID. Thanks. stay safe and healthy.
It’s the perfect birthday treat! Cool Whip is just the thing! You can also make homemade and it is wonderful too. But I usually go with Cool Whip to make it easy! I would love to see how it turns out!
I made this for a potluck at work. Everyone loved it..
I am thrilled that you shared this and it was a hit! Thank you so much Shelly! Hope you have a blessed Thanksgiving.
This looks amazing! It’s an easy recipe and everyone would fight to get a piece of this pie at a party! I’d hate to miss the last piece. Better make two pies!
Thank you Joanne! SO true and this one is super easy so go ahead an make two! It freezes well also!
Oh wow, this looks absolutely amazing. I could eat a lot of this!
Thank you Julie! It sure is hard to resist and super easy to make!
This is gorgeous!! Pinned for later for sure- my kids will adore me!
Thank you Barrie! It is really easy to make too! My son would agree with your kids! I get extra points for this one!
So full of flavor and yumminess! Looks amazing!
That’s one decadently delicious looking pie!
Thank you so much!
I am literally drooling. I’m not even sure where to start. No bake- yes please! Peanut butter- oh yeah baby! and peanut butter cups- SOLD! My family would devour this in one sitting and I’m not even ashamed!
Thank you so much! I love EASY and delicious! No shame friend! Just ENJOY every BITE! <3
This dessert looks so good. Peanut butter cups are my favorite candy.
Cindy I knew we were fast friends! So have you tried them frozen?
That pie is pretty darn stunning! Wow!!
Thank you Karen! It really is a cinch to put together too! All that chocolate and peanut butter make it a beauty!
Oh my goodness! I love everything about this! YUm
I agree! What’s not to love chocolate and peanut butter! Oh MY!!!
OMG, I need to make this, like, yesterday. It looks ahhhhmazing!
Thank you Kate! And it’s super easy to make too!
Holy Samoly does that look delicious!
That looks SO GOOD! I love the peanut butter in side and the candies on top. LOVE it!
You totally have me drooling this morning and in the mood to head to the market and buy all of the ingredients to make this for breakfast!!!
OMG! I eat a PB sandwich just about every single day. It was my go-to lunch in elementary school. My husband also puts the Reese’s PB cups in the freezer because he knows I won’t eat them frozen. My family will love this pie! I can’t wait to make it!