
This post may contain affiliate links. Please read our disclosure policy.
This cookie pie crust is proof that the easiest recipes are often the best ones. Crushed cookies and melted butter, pressed into a pie plate, no rolling pin and no chilled dough to fuss with.
Use whatever crunchy cookie you already have in the pantry to build the base for a no-bake cheesecake, a pudding pie, or any filling that needs something sturdy underneath it. This no bake cookie crust works with whatever you’re making, which makes it one of the most useful crusts in your back pocket.
I love to use this crust in my Red, White, and Blueberry Cream Pie and Chocolate Chip Cookie Candy Cream Pie. But the sky is the limit to where you can change out the crust.

My family, especially my husband, loves Chip Ahoy cookies. So when I started making this crust, he started calling it Chip Ahoy Cookie Crust, and the name just stuck around our house.
Whenever a pie comes to the table with this crust, the whole family goes back for seconds. They say it’s the best crust they’ve ever had, and honestly, I believe them.
This crust also became a summer staple of mine. During those months in Florida when turning on the oven feels like a punishment, this no-bake crust is a lifesaver. Even when it’s not blazing hot outside, sometimes you just want an easy crust without the extra step.
Why You’ll Love This Chocolate Chip Cookie Pie Crust Recipe!
This easy cookie pie crust takes the stress out of pie night, no oven, no fuss, just a few simple steps.
- Two ingredients, endless uses. Cookie crumbs and butter are all it takes to build a base that works for cheesecakes, pudding pies, and more.
- Ready in about 10 minutes. No chilling dough, no rolling, no waiting on the oven to preheat.
- The perfect alternative to graham cracker crust or Oreo crust. If you want something different under your favorite filling, this is it.
- Works with whatever cookie you have on hand. Chocolate chip is the classic here, but you’re not locked into one option.
Cookie Pie Crust Ingredient Notes

- Chocolate Chip Cookie Crumbs: Reach for crisp, store-bought cookies like Chip Ahoy Original. Skip bakery-style or soft-baked cookies, they won’t hold their shape once they’re crushed and pressed into a crust. Any crunchy cookie works here, too, so feel free to swap in your favorite (more on that in the variations below).
- Butter: Salted butter adds a nice hint of flavor, but unsalted works fine if you add a pinch of salt. The butter is what binds the crumbs together and gives the crust its buttery flavor.
How to Make a Chocolate Chip Cookie Crust
✱ Below shows step-by-step photos and instructions. For the complete recipe, along with ingredient amounts, scroll down to the recipe card.
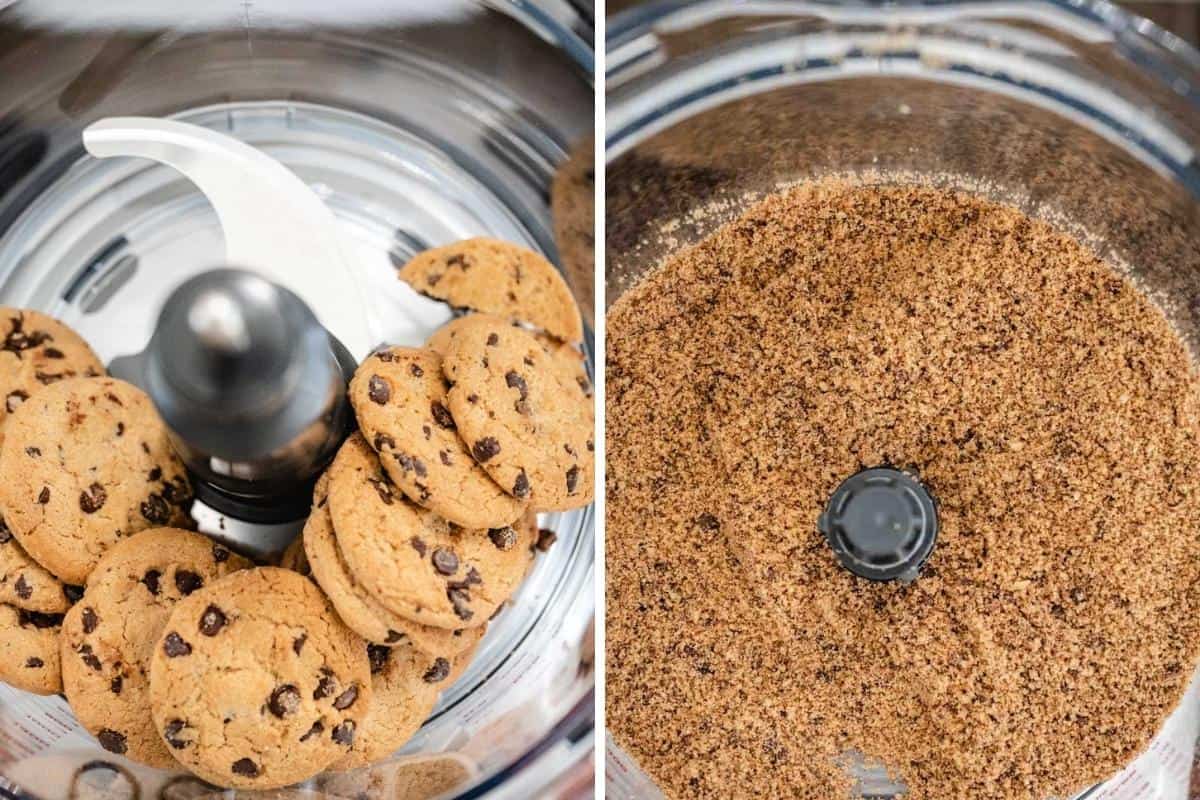
Step 1 | Finely Crush Chocolate Chip Cookies
This step matters more than it seems, since how fine the crumbs are affects how well the crust holds together.
Food Processor: Pulse the cookies until they’re ground into fine, even crumbs.
By Hand: No food processor? Seal the cookies in a zip-top bag, leaving a small gap so it doesn’t pop, then crush them with a rolling pin or a heavy can until finely ground.
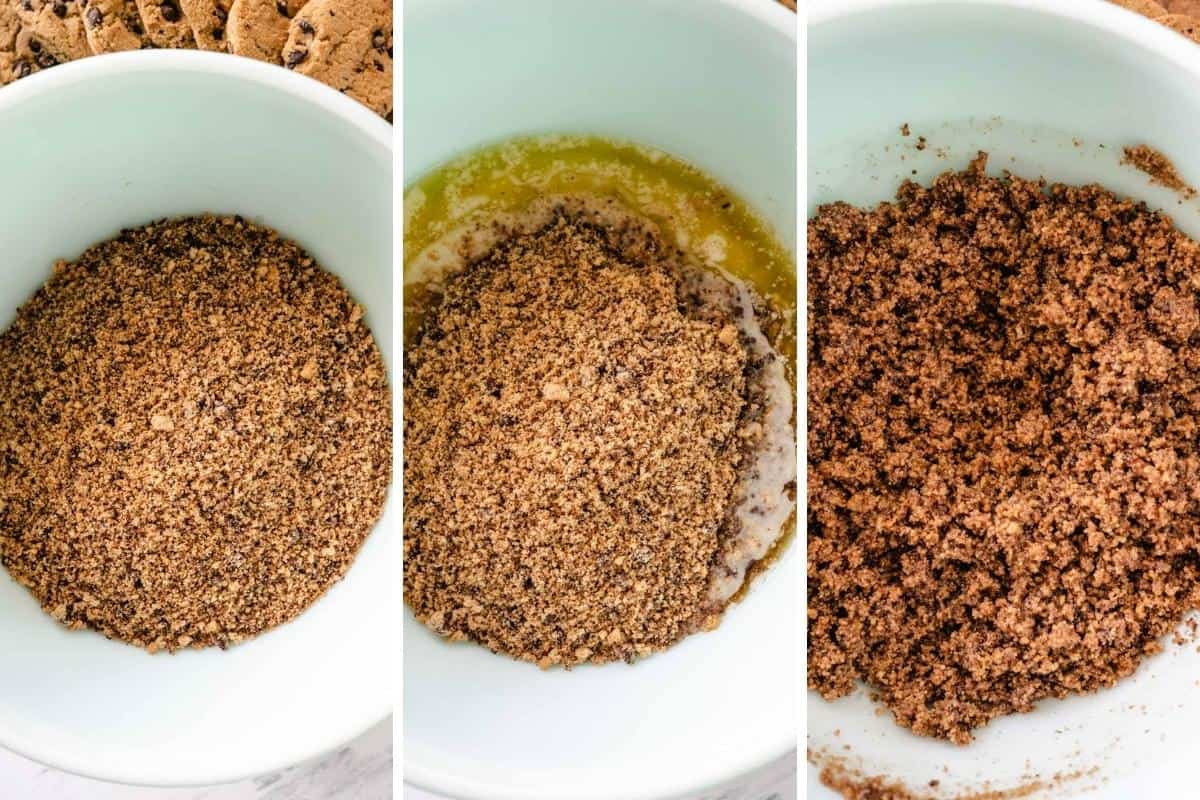
Step 2 | Melt Butter and Mix with Crumbs
Melt the butter in the microwave for 30 to 45 seconds, or in a saucepan over medium heat on the stovetop.
Pour the melted butter over the crumbs in a medium bowl and stir with a fork until combined. No hand mixer needed. You can also do this right in the food processor, drizzling the butter in as you pulse. The texture should look like wet sand.
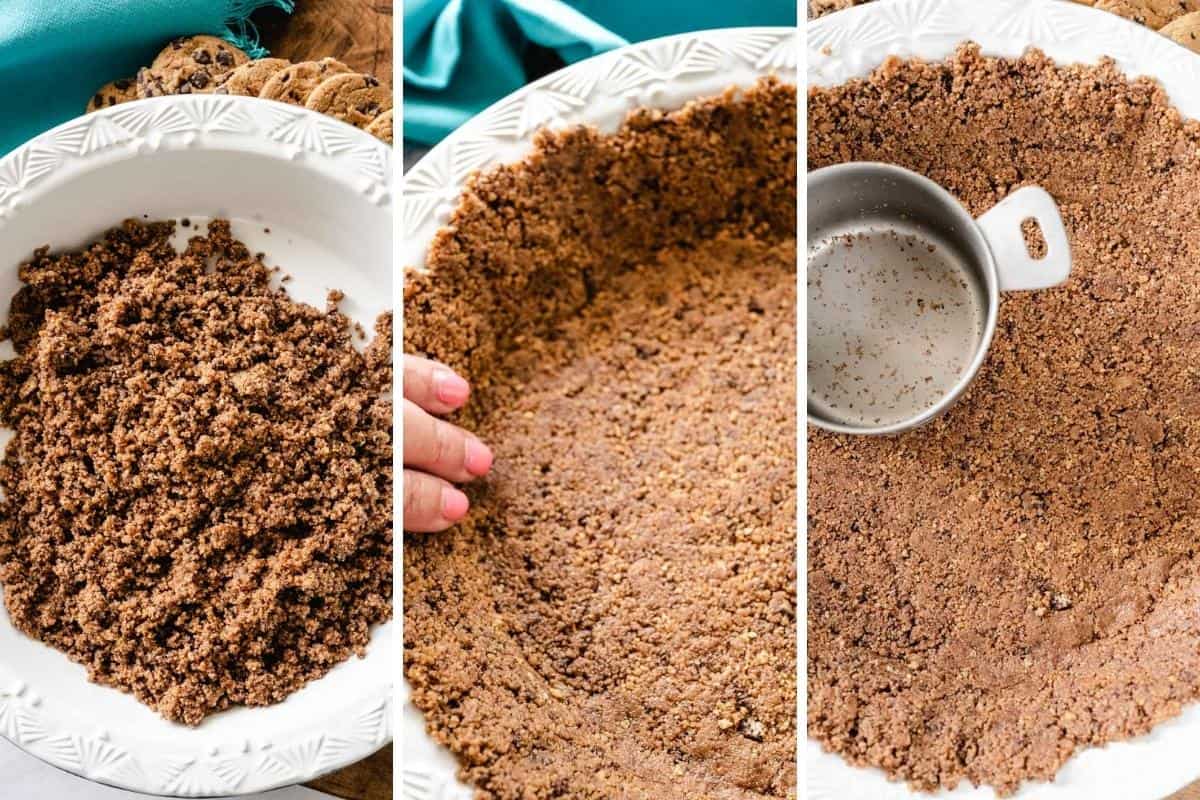
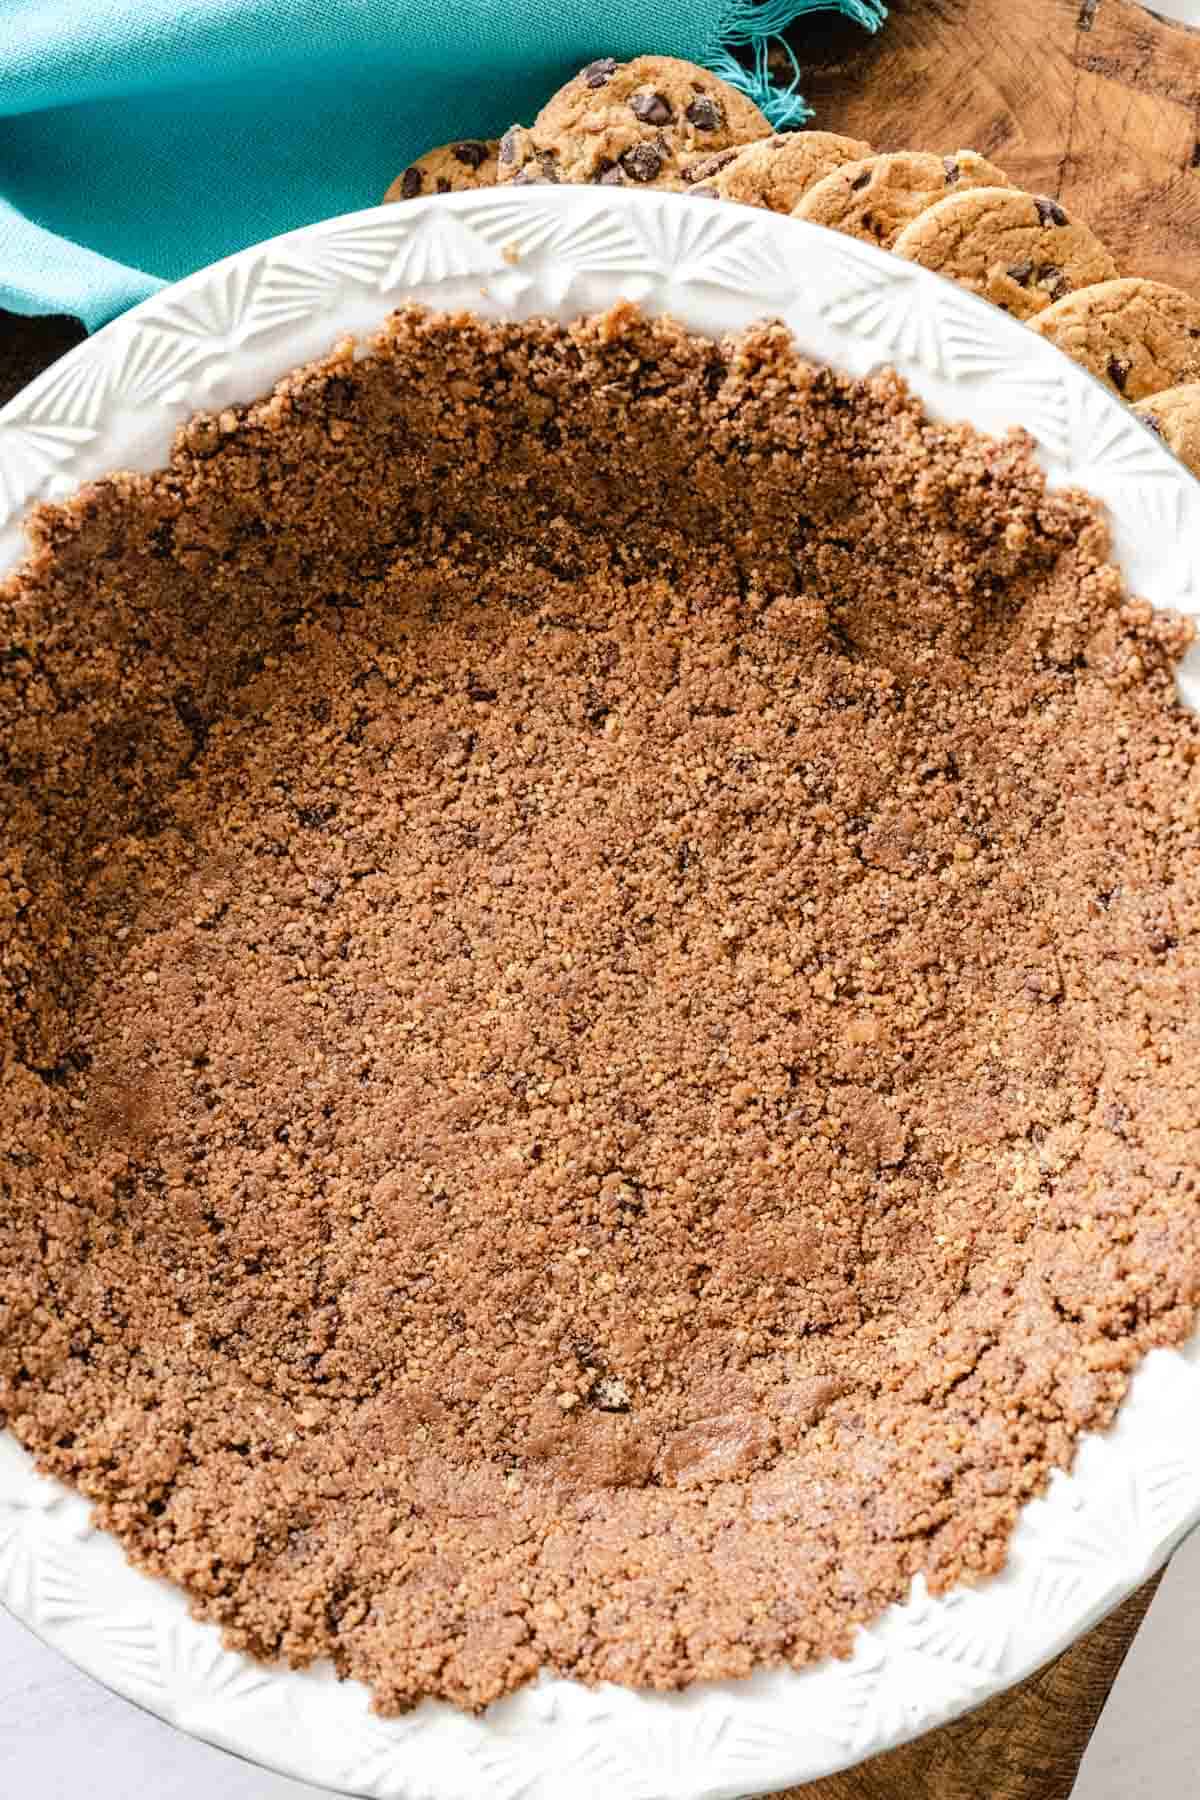
Step 3 | Pour Cookie Crumbs into Pie Plate and Form Crust
Pour the crumb mixture into a 9-inch pie plate. Press the crumbs up the sides first to form the edges, then work the rest down into the bottom in an even layer.
Use the bottom of a measuring cup or a glass to firmly pack the bottom, and your fingers to press the sides into place.
Just don’t press too hard; packing it too tightly can make it tough to slice later.
Step 4 | Freeze Crust
Freeze the crust for at least 30 minutes before filling it.
You can bake it instead if you’d like, though it’s not necessary since the cookies are already baked. More on why you might want to in the tips below.
Cookie Crust Recipe Substitutions and Variations
What makes this cookie crust recipe so handy is how easily it adapts to whatever cookie you have in the pantry.
- Other Crunchy Cookies: Swap in your favorite crunchy cookie, like vanilla wafers, shortbread, or oatmeal cookies. Anything similar in texture to chocolate chip cookies will work the same way.
- Gingersnap Cookies: Their warm spice pairs especially well with a key lime or pumpkin filling.
- Vanilla Wafers: A milder crumb that lets a fruit filling like strawberry or lemon take center stage.
- Oreo Cookies: A chocolate-forward crust that’s a natural match for chocolate or peanut butter fillings.
- Gluten-Free Cookies: A crispy gluten-free chocolate chip cookie works just as well, since the method doesn’t change, just the cookie. Always check labels carefully if anyone at the table has celiac disease, since cross-contamination and ingredient lists vary by brand.
Tips
These tips will help your cookie crust turn out right every time, no matter which cookie you use.
- If your mixture isn’t quite right: If it isn’t binding together, you probably need more butter. Start with an extra tablespoon. If it’s too wet (you may have too much butter), add a few more crushed cookies until you reach that wet-sand texture.
- Build the sides first, then the bottom. Press crumbs up the sides to form the edge before working the rest into the bottom. Doing it the other way around tends to leave the sides thin and more likely to crumble when you serve.
- Round the corner where the bottom meets the sides. A sharp angle there is a weak point. Use the back of a spoon to soften that corner so your slices come out clean.
- Don’t overpack it. Press until the crumbs hold together and aren’t crumbly anymore, not until it’s packed in like concrete. Too tight and it gets hard to cut.
- Pan Size: This works in a 9-inch pie plate or an 8 or 9-inch round or square pan.
- Want a toasted flavor? Baking the crust at 350° for 5 to 8 minutes isn’t necessary, but it helps the crumbs hold together a little better and adds a bonus toasty flavor if that’s what you’re after. Double the recipe for a 9×13 dish.

Ways To Use This Cookie Crust:
I love to use this crust in my Red, White, and Blueberry Cream Pie and Chocolate Chip Cookie Candy Cream Pie, but the sky is the limit to where you can change out the crust.
This really works well for any no-bake pie recipe you want to fill. Let the crust chill, then fill to your heart’s desire.
No-bake pie crusts are perfect for simple fillings, or you can go decadent with a layer of chocolate ganache, hot fudge, and your favorite ice cream. Garnish with white chocolate chips, slivers of dark chocolate, or mini semisweet chips to make it extra special.
Fill it with any sweetened cream cheese mixture for a no-bake cheesecake, a pudding filling, or use it as the base for one of the easy desserts below.
Storage Instructions
This is a great make-ahead cookie crust.
Storage: Cover with foil or plastic wrap, or store in an air-tight container in the refrigerator for 3 to 5 days.
Make Ahead: Make the crust up to 5 days in advance and keep it in the fridge until you’re ready to fill it, or go straight to the freezer if you want it ready further out.
Freezing: Make this in a freezer-safe or disposable pie pan and freeze for 2 to 3 months.
Frequently Asked Questions
Here are the most commonly asked questions about this recipe. If you don’t find the answer to your question, leave a comment below, and I’ll get back to you.
A cookie pie crust is a no-bake alternative to traditional pie dough, made by pressing crushed cookies and melted butter into a pie plate. It’s a quick, sturdy base for pies and cheesecakes that don’t need a baked crust underneath them.
I go for store-bought regular chocolate chip cookies, like crunchy Chips Ahoy. You can use any type of similar cookie or store brand you love. It doesn’t even have to be chocolate chip. Just a crisp cookie – nothing soft-baked!
Yes. A crispy gluten-free chocolate chip cookie works just as well in this recipe. Again, just go for a crisp cookie, nothing soft-baked
The cookies are already pretty sweet, even more so than graham crackers, and this also has chocolate chips for even more sweetness, therefor extra sugar isn’t needed. If you are using another cookie or just want added sweetness, add a tablespoon at a time until you get the desired sweetness.
No, this is meant to be a no-bake crust, and I like the texture best after freezing it for at least 30 minutes. You can bake it at 350° for 5 to 8 minutes if you want a toasted flavor, just watch it closely so it doesn’t burn
More Delicious Pie Recipes
- No-Bake Peanut Butter Cup Pie
- Easy Coconut Cream Pie
- Best Key Lime Pie Recipe
- Lemon Icebox Pie
- Chocolate Cashew Pie by my friend at Norine’s Nest
Hungry for more easy, home-cooked, delicious recipes?
Sign up for my free recipe club to get family-friendly recipes in your inbox each week! Find me sharing daily meal-time inspiration on Pinterest, Facebook, and Instagram.

No-Bake Chocolate Chip Cookie Crust
Click Stars To Rate
Ingredients
- 2 ¼ cups Chocolate Chip Cookie Crumbs - (about whole 18 whole cookies finely ground)
- 5 to 6 tablespoons butter - melted
Instructions
- Crush the cookies in your processor until they are finely ground. If you don't have a food processor, you can smash the cookies in a plastic bag with a rolling pin.
- Melt butter in the microwave for 45 seconds or until melted. You can also melt in a saucepan on the stovetop over medium heat.
- Mix together the crumbs and the butter. You can do this in a bowl or in the food processor.
- Pour the crumbs into the pie plate. First, start pressing the ingredients up the sides of the pie plate to form the edges. Once the edges are formed work the crumbs down to evenly distribute into the bottom of the pie plate and pack it down into an even layer (the bottom of a measuring cup or a glass helps to press firmly).
- Freeze the crust for 30 minutes for a no-bake pie crust.
Notes
- If your mixture isn’t the right consistency: If it isn’t wet or binding together enough – you may not have enough butter. Just add a little more butter – start with 1 Tablespoon. If it’s too wet (you may have too much butter). Then you will want to add a few more crushed chocolate chip cookies. You are looking for a wet sand-like texture.
- Pan Size: This will work in a 9-inch pie plate or an 8 or 9-inch round or square pan.
- Double the recipe to use in a 9 X 13 dish.
Want to Save this Recipe?
By submitting this form, you consent to receive emails from Soulfully Made.
Do you have a recipe combing graham cracker with chocolate chip to form a pie crust?because I thought it would be much easier to use graham cracker,if you have extra graham cracker leftover from another recipe?
I really haven’t tested one using graham crackers but it’s something I need to try sometime soon. Maybe start with 1/2 cup of chocolate chips and test it with my graham cracker crust recipe. I’d love to hear if you do.