


This post may contain affiliate links. Please read our disclosure policy.
With just 5 simple ingredients, this Taco Casserole with Tortillas bakes up hearty, cheesy, and full of flavor. The secret is letting the seasoning and queso do the heavy lifting, stirred right into the beef so every layer tastes just as good as the one before it.

If there’s one thing I’m gonna do, it’s turn just about anything into a casserole. I’ve been doing it for years, and honestly? I don’t see myself stopping anytime soon. There’s something so satisfying about layering up all those good flavors and letting the oven take it from there while you get on with the rest of your evening.
This one is basically Taco Tuesday in casserole form, and I mean that in the very best way. You’ve got well-seasoned ground beef, creamy queso worked right into the filling, soft flour tortillas holding everything together, and melty cheese on every single layer. It’s the kind of meal that makes people come back for seconds without you even having to ask.
The best part? It’s genuinely simple. Brown your beef, stir in the seasoning and queso, layer it all up, and let the oven do the rest. If you can do that, you can make this casserole — I promise.
Why Everyone Loves This Taco Casserole with Tortillas
- Dinner is basically done in 30 minutes. The prep is minimal, and the ingredients are simple. Once it’s in the oven, you’ve got time to get the table set, help with homework, or just take a breath.
- Anyone can make it. If you can brown ground beef and layer ingredients in a pan, you’ve got this. I’d hand this recipe to a brand-new cook without a second thought.
- Every single layer is loaded with flavor. Between the queso stirred right into the beef and the melty cheese in every layer, there isn’t a bland bite in this dish.
- It feeds a family nicely and doubles easily. This recipe makes six generous servings, and if you’re feeding a bigger group, it doubles beautifully. Just grab a larger pan, and you’re set.
- Toppings make it your own. Set out a little topping bar and let everyone build their own plate. That part is always fun.
Ingredients You’ll Need
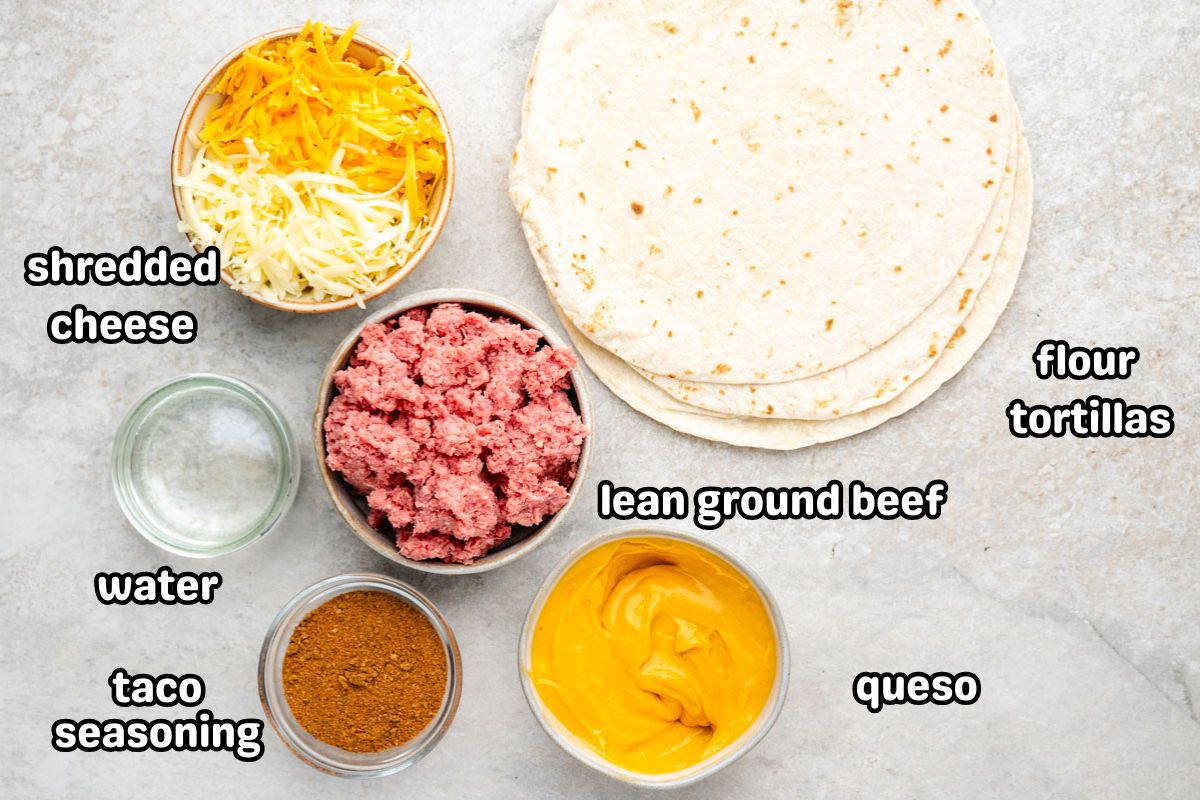
- Lean Ground Beef: The heart of the filling. I always go lean here, so the casserole doesn’t end up greasy. You’ll still get plenty of savory flavor, especially once the seasoning and queso go in.
- Taco Seasoning: This does all the heavy lifting on flavor in one easy step. Your favorite store-bought blend works just fine, or if you like to make your own, I have a homemade taco seasoning that I absolutely love.
- Water: Just a splash to help the seasoning distribute evenly and give the beef a little saucy consistency. Don’t skip it!
- Homestyle Queso: This is the secret that takes the filling from good to really good. It adds creaminess, depth, and a little something extra that makes people ask what’s in there. Reach for the kind you’d scoop chips into.
- Flour Tortillas (taco size): These act as your layers, soaking up all that flavorful filling as the casserole bakes. They stay soft and tender and hold everything together perfectly when you go to slice it.
- Shredded Mexican Cheese Blend: Melts like a dream and gives you that gorgeous gooey finish. If you’re shredding your own, a mix of cheddar and Monterey Jack is the way to go.
How To Make Taco Casserole with Tortillas
✱ Below shows step-by-step photos and instructions. For the complete recipe, along with ingredient amounts, scroll down to the recipe card.
Step 1 | Get the Oven Going and Prep Your Pan
Preheat oven to 350℉.
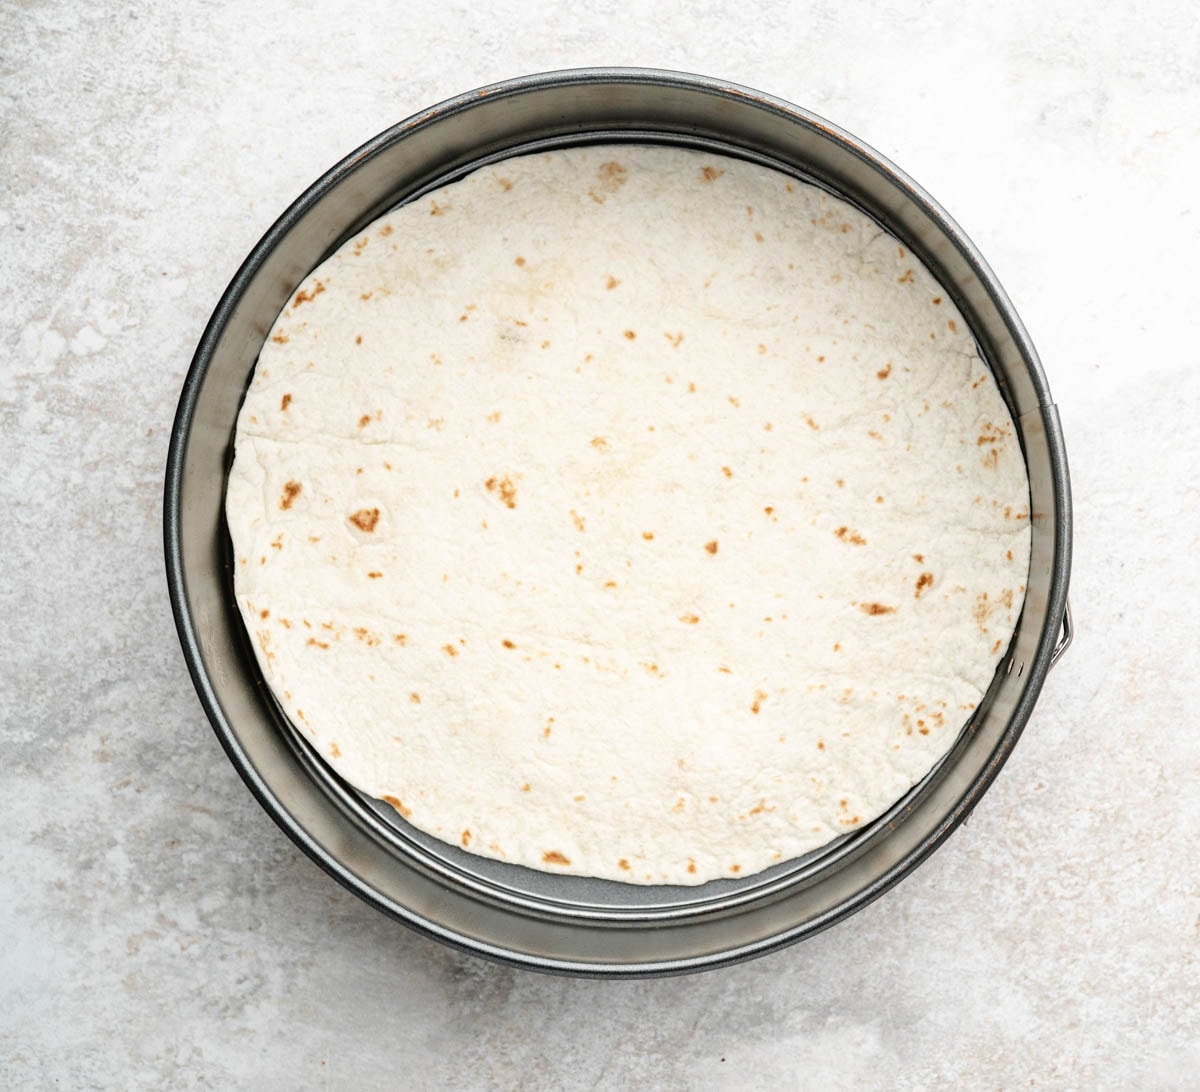
If you’d like to lift the casserole out cleanly for serving 8-inch round baking dish with parchment paper with tabs, or leave a little overhang on the sides so you have tabs to grab onto. A springform pan works great for this, too.
If you’re just serving it straight from the dish, a light spray of cooking spray is all you need.
Step 2 | Brown the Beef
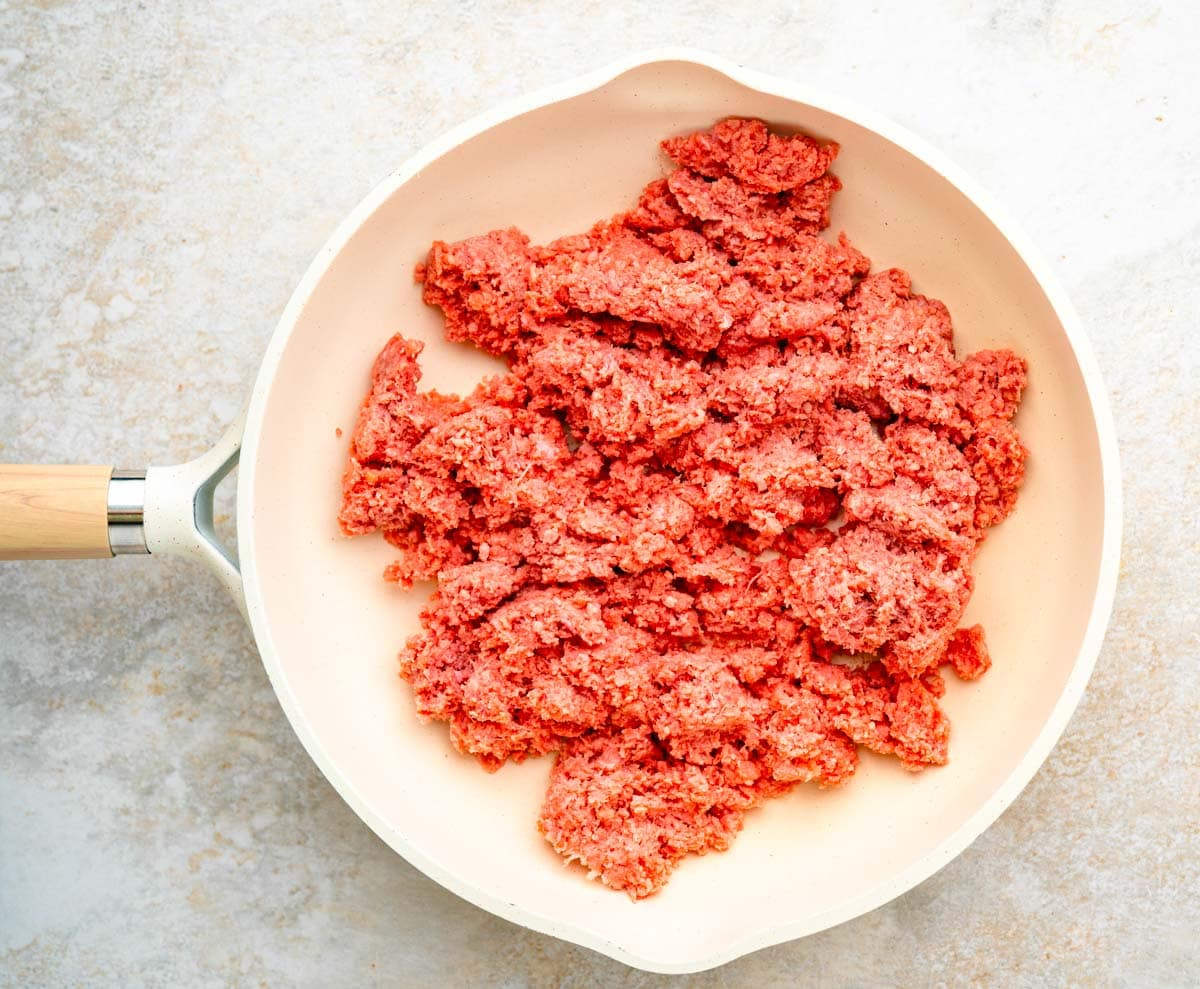
In a large skillet over medium-high heat, brown and crumble your ground beef until it’s fully cooked through.
Drain off any excess grease before moving on. Getting rid of that extra grease keeps the casserole from turning out oily and helps everything hold together nicely.
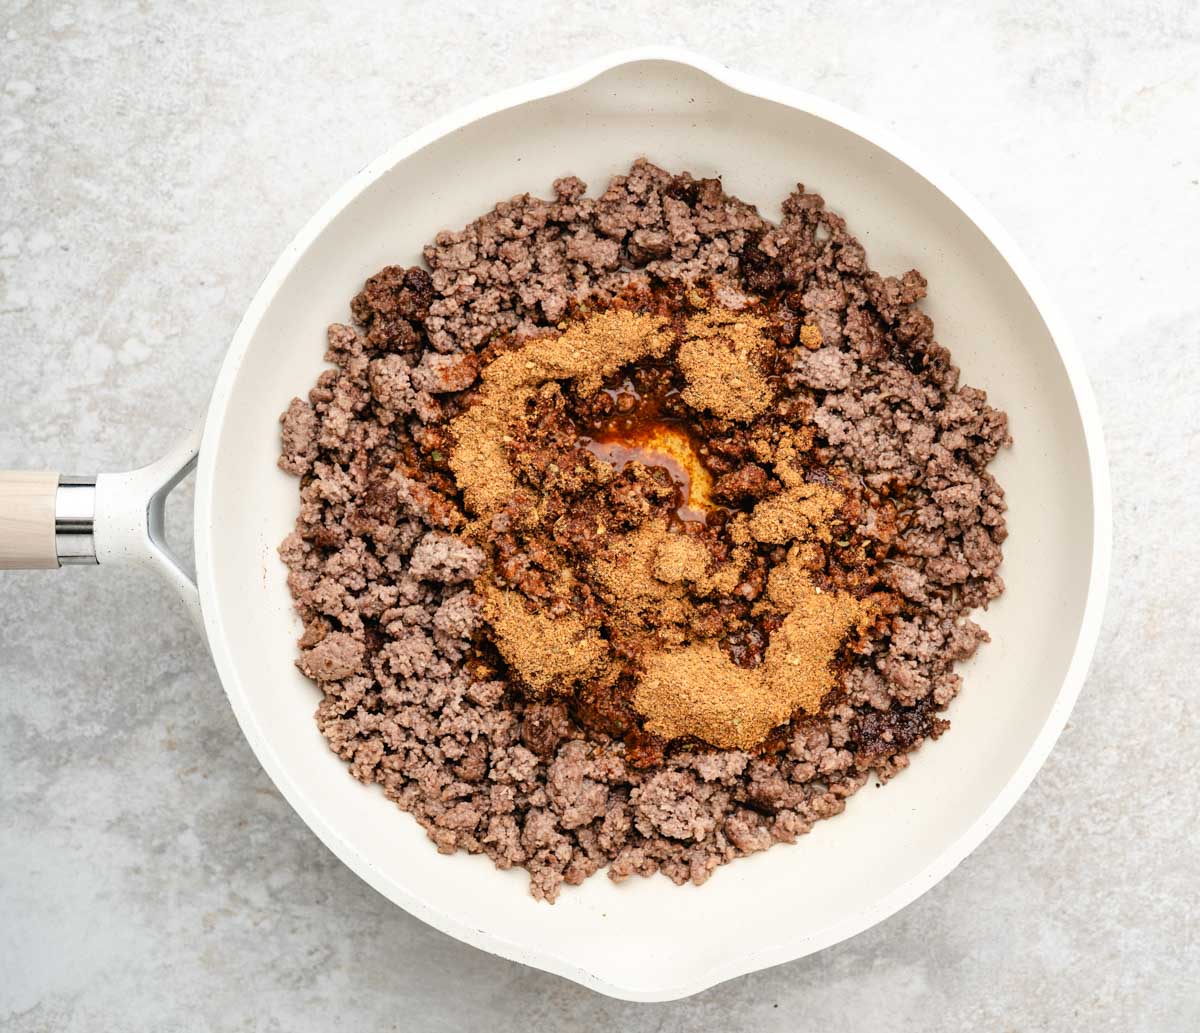
Step 3 | Season the Beef
Add the taco seasoning and water to the drained beef and stir to combine. Let it cook for a couple of minutes, until most of the liquid has been absorbed and the beef is nicely coated in the seasoning.
You’ll know it’s ready when most of the liquid has cooked off, and everything smells amazing.
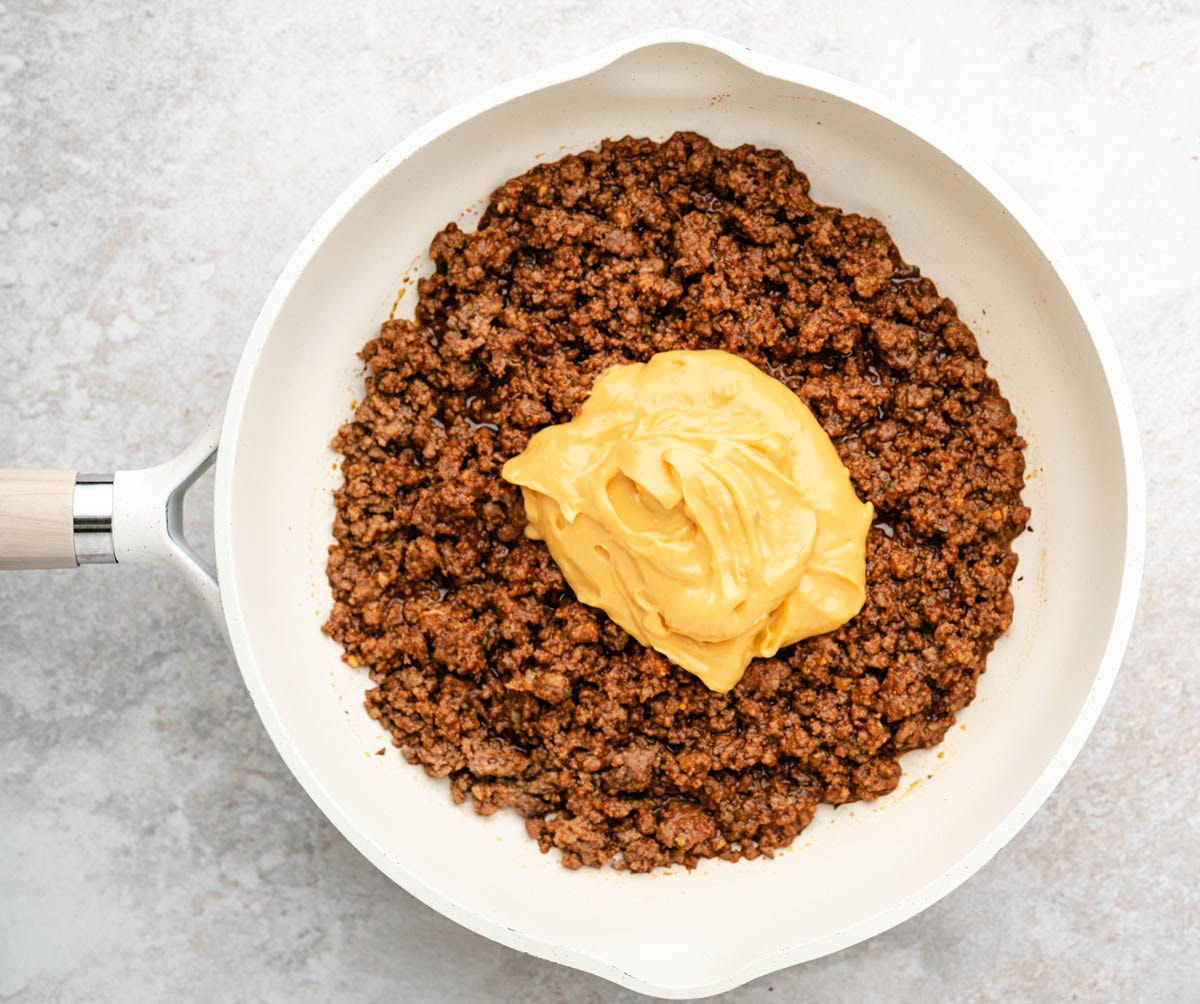
Step 4 | Add the Queso
Turn the heat down to low and add in your queso. Stir it all together until the queso is fully mixed into the beef and everything is heated through.
This is where the filling goes from good to really good. Give it a little taste here and adjust the seasoning if needed.
Step 5 | Layer the Casserole
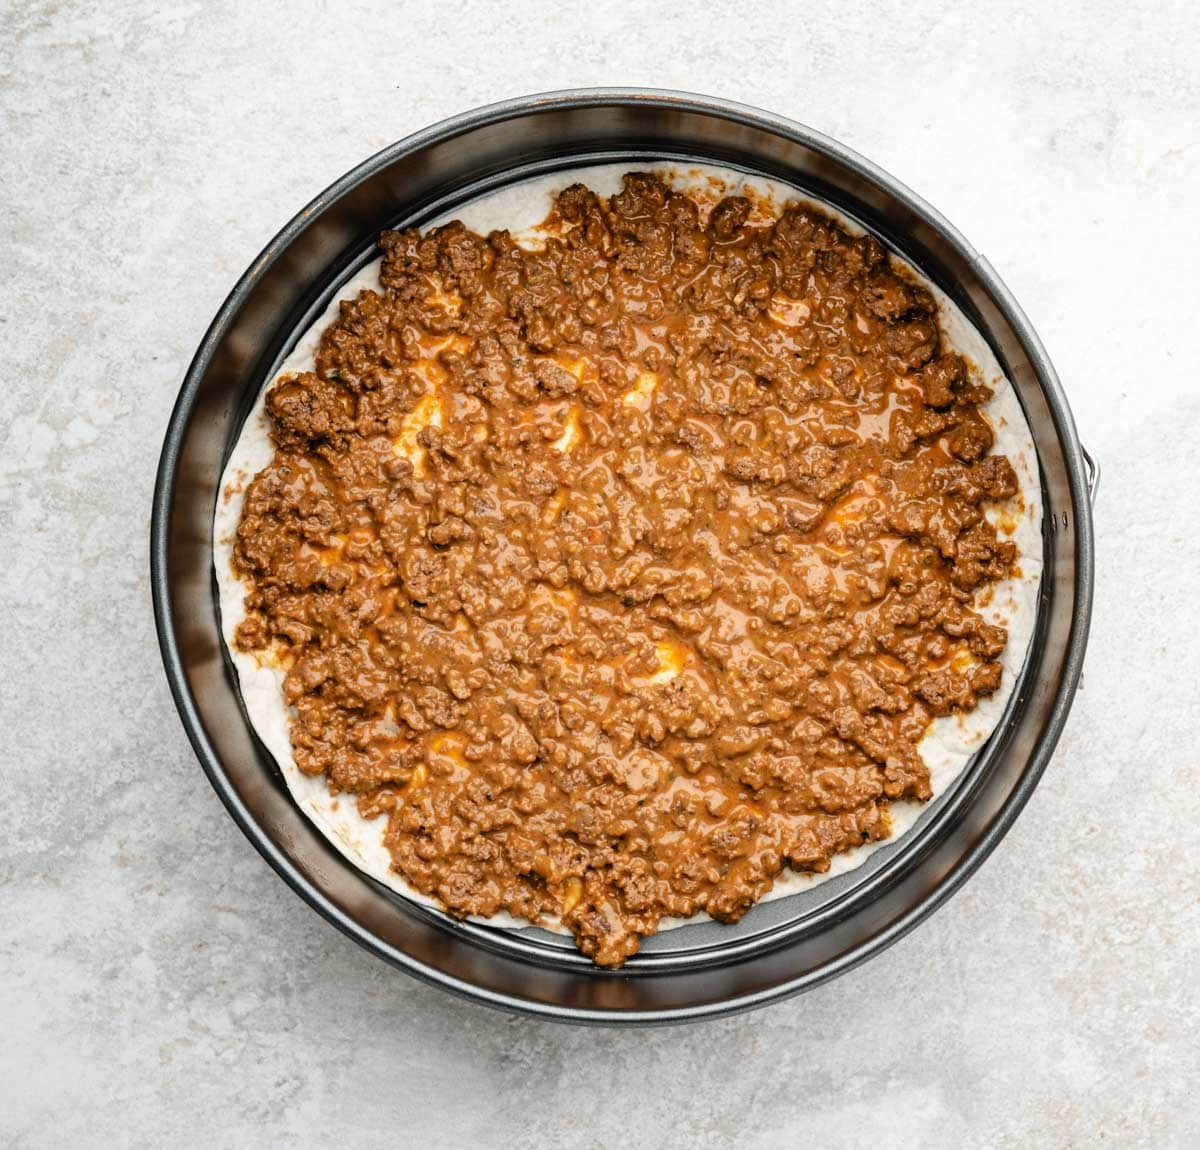
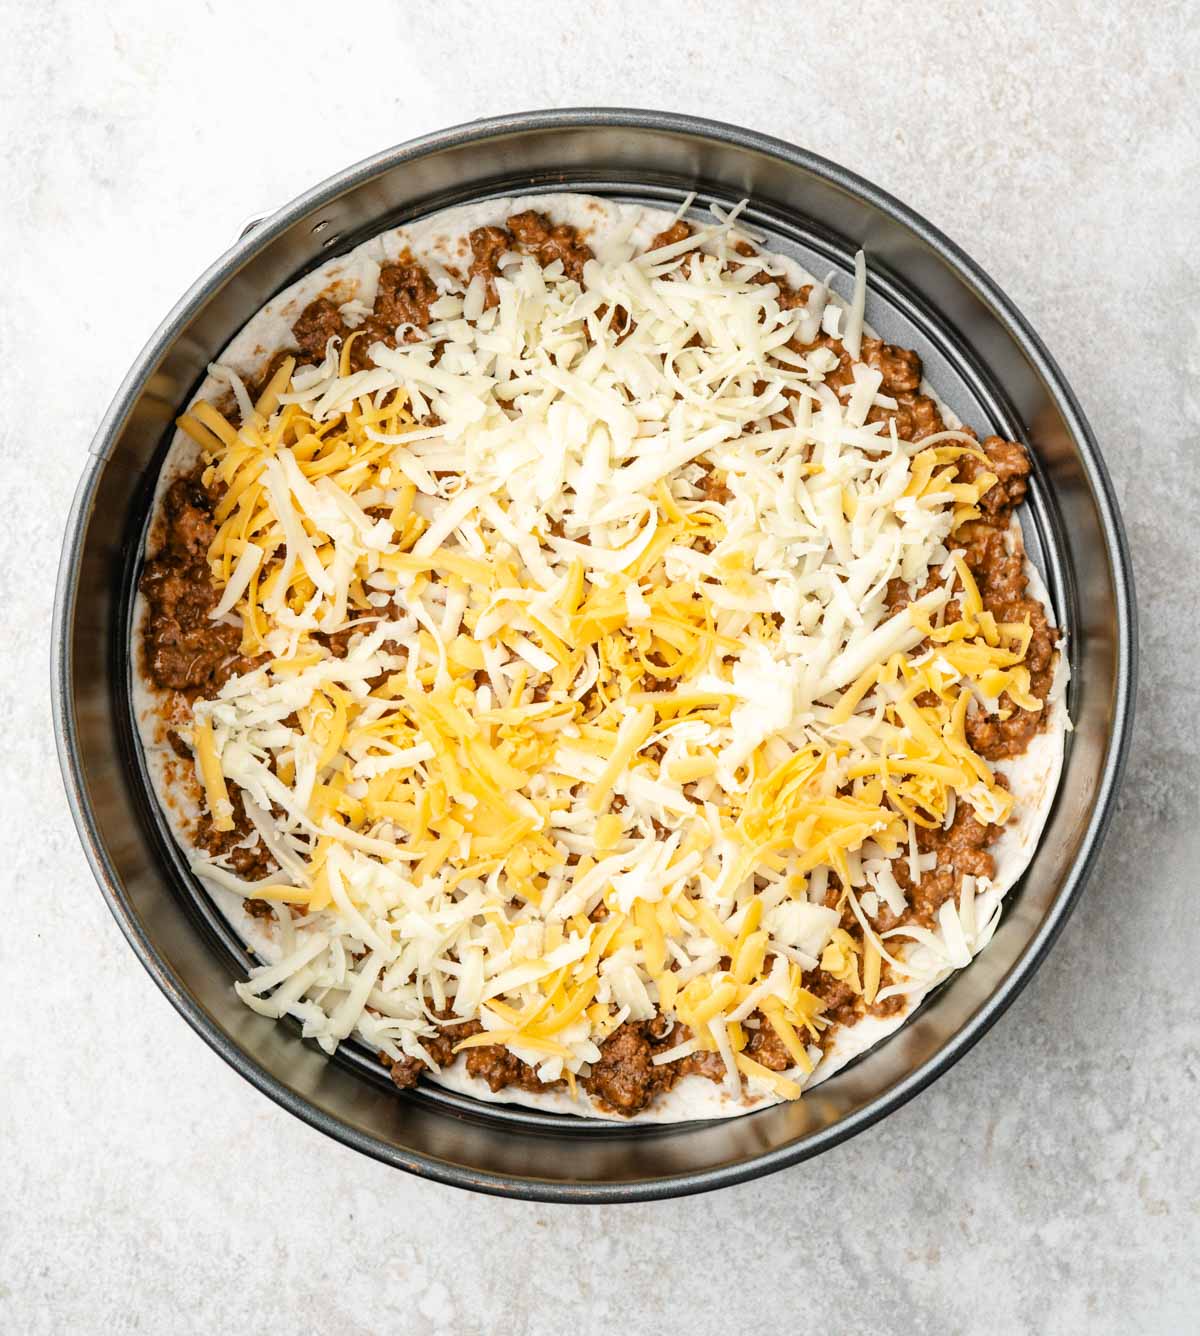
Now for the fun part. Place one flour tortilla in the bottom of your prepared pan. Spread about a third of the beef mixture over the top, then sprinkle about a third of the shredded cheese over it.
Repeat those layers two more times: tortilla, beef, cheese, until everything is used up.
Step 5 | Bake, Rest, Serve
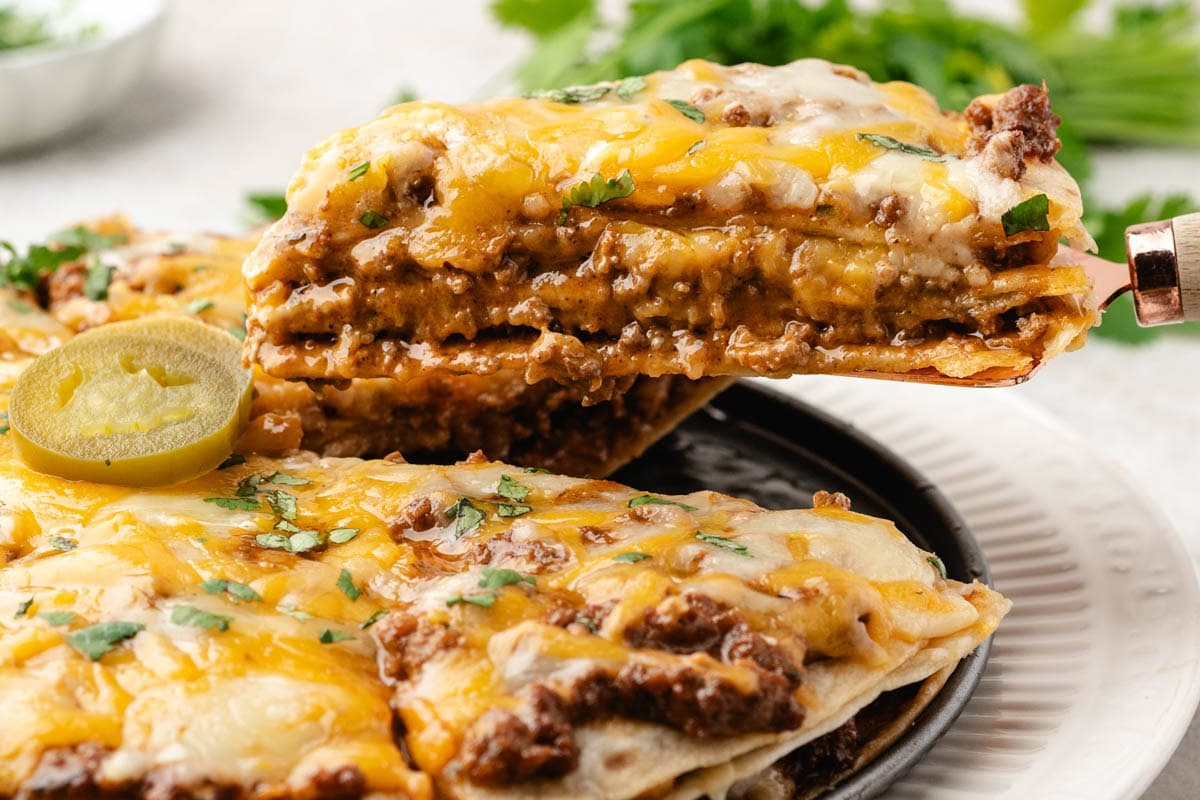
Bake at 350°F for 15 to 20 minutes, until the cheese is fully melted and the edges are just starting to turn lightly golden.
Once it comes out of the oven, let it rest for about 5 minutes before slicing. That little rest makes a real difference and gives everything a chance to set up so you get clean, beautiful slices. I know it’s tempting to dig right in, and honestly, sometimes I can’t wait either, but trust me on this one.
Top with whatever you love most and serve it up!
Topping ideas: sour cream, diced tomatoes, shredded lettuce, sliced black olives, pickled jalapeños, avocado or guacamole, fresh cilantro. Load it up!
Easy Ways to Switch It Up
- Swap the ground beef for ground turkey. A lighter option that still soaks up the taco seasoning beautifully. Great if you’re looking to cut back on red meat without sacrificing any flavor.
- Use corn tortillas instead of flour. They give the casserole a slightly different texture and a little more of that classic taco flavor. Just know they’re a bit more delicate, so handle them gently when layering.
- Add beans or vegetables. Black beans, corn, or sautéed bell peppers are all wonderful additions. They bulk up the filling, add great texture, and make the casserole even more hearty.
- Turn up the heat. Use hot taco seasoning, spicy queso, or tuck some diced jalapeños between the layers. A little heat goes a long way in this one.
- Use whatever melty cheese you have. Mexican blend is my go-to, but pepper jack, sharp cheddar, or even a mix of what’s already in your fridge will work just fine.
How to Make This Casserole Gluten Free
Good news — this casserole is really easy to make gluten-free with just a few simple swaps. Here’s what to watch for:
Tortillas: Swap the flour tortillas for your favorite gluten-free variety. I really like Mission, Siete, or La Tortilla Factory for this. They all hold up well in a baked casserole without falling apart on you, which matters when you’re layering.
Taco Seasoning: This is the one people often overlook, but seasoning blends can sneakily contain gluten. My homemade taco seasoning is naturally gluten-free and, honestly, the best option for flavor here. If you’d rather grab something from the store, Old El Paso and Siete both offer certified blends that work beautifully.
Queso: Not all queso is created equal when it comes to gluten-free. I love Gordo’s brand. Always flip the jar over and check the label before you buy.
Cheese: This one surprises people! Some shredded cheese blends contain added fillers or starches that can contain gluten. Give the label a quick look, then choose a filler-free blend.
Everything else in this recipe is naturally gluten-free, so once you’ve got those swapped out, you are good to go. Same layers, same method, same delicious result.
Cooking for someone with celiac disease? Always check every label carefully and look for certified gluten-free on each ingredient before you start. I use the Fig app to do this for my granddaughter.
Expert Tips from My Kitchen to Yours
- Grease your pan well. Even with all that cheese and filling, things can still stick. A good spray of cooking spray or a little brush of melted butter around the bottom and sides makes cleanup so much easier. I love using parment in this one!
- Drain the beef. Draining off that excess grease is one of those small things that makes a big difference in the final result. It keeps the casserole from sitting in a pool of grease and helps the layers hold together properly.
- Spread your layers evenly. Take an extra minute to make sure each layer of beef and cheese covers the tortilla from edge to edge. It helps the casserole bake up evenly and means every single slice is equally good.
- Let it rest before you cut it. Five minutes is all it takes. The layers firm up just enough to give you clean, stackable slices. If you can’t wait, it’ll still taste incredible, just a little more rustic looking!
What to Serve With Taco Casserole
This taco bake pairs perfectly with your favorite Mexican-inspired sides! I love it with a side of Instant Pot Mexican Rice or a scoop of Refried Black Beans.
If you’re hosting, a big bowl of chips with guacamole and salsa on the table is never a bad idea. It turns dinner into a little event, and people love it.

Storage & Make-ahead Tips
Make Ahead: Assemble the whole casserole, cover it tightly, and refrigerate until you’re ready to bake. This is a great option when you want dinner mostly done before the evening chaos starts. Just pop it in the oven when you’re ready and add a few extra minutes to the bake time since it’s coming from the cold.
Storage: Leftovers keep well in an airtight container in the refrigerator for 3 to 4 days. It reheats beautifully, which makes it a great option for meal prep or those nights when you just need something ready to go.
Freezer: Wrap the casserole tightly and freeze for up to 2 months. Thaw it overnight in the fridge before reheating. It comes back together really nicely and tastes just as good as the day you made it.
Your Questions, Answered
This is where you get to have fun with it! I love a dollop of sour cream, some fresh diced tomatoes, shredded lettuce, sliced black olives, and pickled jalapeños. Avocado or guacamole is always a yes, and a little fresh cilantro on top makes it look as good as it tastes. Set out a few options and let everyone build their own plate.
Absolutely. Ground turkey or ground chicken are both great lighter swaps and work just as well with the taco seasoning and queso. For a vegetarian version, black beans, pinto beans, or even lentils are wonderful options. The seasoning carries it beautifully, no matter what you choose.
You’re looking for fully melted cheese and edges that are just starting to turn lightly golden. Since the filling is already cooked through, all you’re really doing is heating everything together and getting that cheese perfectly melted. It usually hits that point right around the 15 to 20 minute mark, but every oven is a little different, so start checking at 15.
More Easy Casserole Recipes to Try
Hungry for more easy, home-cooked, delicious recipes?
Sign up for my free recipe club to get family-friendly recipes in your inbox each week! Find me sharing daily meal-time inspiration on Pinterest, Facebook, and Instagram.

Taco Casserole with Tortillas Recipe
Click Stars To Rate
Ingredients
- 1.25 pounds lean ground beef
- 1 packet taco seasoning - I used Kinders Mexican taco seasoning for a smoky flavor
- ½ cup water
- ¾ cup homestyle queso - I use Gordo’s brand in the refrigerated section or original for Gluten Free
- 3 8-inch flour tortillas - soft taco size
- 2 cups shredded mexican cheese - if shredding yourself use 1 cup sharp cheddar and 1 cup monterey jack
Instructions
- Preheat oven to 350℉. If you would like to easily remove the casserole, line a 8 inch round baking dish with parchment paper with tabs, or use a spring form pan. If serving in the dish just lightly spray the pan.
- In a large skillet, over medium-high heat brown and crumble, lean ground beef. Drain excess grease.
- Add in taco seasoning and water. And stir to combine. Cook until most of the liquid is absorbed.
- Turn the skillet to low. Add in queso and stir until thoroughly combined and heated through.
- Layer the bottom of the pan with one of the 3 flour tortillas
- Add 1/3 of the ground beef taco filling on the the first layer
- Then add ⅓ of the shredded cheese.
- Continue layering (3 layers in total) until you are done with all the layers: tortilla, taco mixture, & shredded cheese.
- Bake at 350℉ for 15-20 minutesor until cheese is melted and edges are slightly golden brown.
- Allow to cool for 5 minutes before slicing and serving.
- Top with your favorite taco toppings. We love it with sour cream, diced tomatoes, sliced olives, pickled jalapenos, and cilantro.
Notes
TIPS
- Grease with melted butter or cooking spray. Even though there’s cheese and beef in this casserole, you’ll still want to lighlty grease your pan well to prevent sticking.
- Layer evenly for the best texture. Try to spread each layer of beef and cheese evenly so every bite has a little bit of everything. This helps the taco casserole bake up evenly and hold together when sliced.
- Allow to cool before slicing. Letting the casserole rest for about 5 minutes helps it set up so you can cut clean slices. If you dig in too early, it’ll still taste great, but it’ll be a little messy!
- Don’t skip draining the beef. After browning, be sure to drain off excess grease so your casserole doesn’t turn out oily. This keeps the texture balanced!
Want to Save this Recipe?
By submitting this form, you consent to receive emails from Soulfully Made.